Performing SUM based on Group in Tableau

Today while working on one of my assignments I got a requirement to perform a SUM of one column values based on a Group of columns in Tableau and being a novice to Tableau I started searching on the internet to find a way to achieve it and after spending few hours I found a solution so thought of sharing over here how I did it.

Below is my data set and I want to calculate the Amount spent each Month and the Total Amount spent in all months, the Average spent, and the Percentage of the Amount spent on each category.

As a first step, I created a Calculated field and named it as AmountSpentPerMonth, and used a FIXED level of Detail Expressions with the following expression:

{FIXED [Name],[Month]:SUM([Amount])}

Next, I created another Calculated field and named it as TotalSpentForAllMonths, and used a FIXED level of Detail Expressions with the following expression:

{FIXED [Name]:SUM([AmountSpentPerMonth])}

Then I created another Calculated field and named it as AverageSpent, and used a FIXED level of Detail Expressions with the following expression:

SUM([TotalSpentForAllMonths])/TOTAL(COUNTD([Month]))

Then I created another Calculated field and named it as PercentageSpentOnEachCategory, and used a FIXED level of Detail Expressions with the following expression:

[Amount]

Moved all calculated fields on Sheet together with other data fields and changed Percentage Compute Using “Category” as shown in a screenshot below:

Build a RESTful API in Go using AWS Lambda

In this post we will learn to design, build, and deploy a RESTful API in Go using AWS Lambda. Before starting, let me give you a brief introduction about AWS Lambda.

What is AWS Lambda?
AWS Lambda is a serverless compute service that runs our code in response to events and automatically manages the underlying compute resources for us. We can use AWS Lambda to extend other AWS services with custom logic, or create our own back-end services that operate at AWS scale, performance, and security. AWS Lambda can automatically run code in response to multiple events, such as HTTP requests via Amazon API Gateway, modifications to objects in Amazon S3 buckets, table updates in Amazon DynamoDB, and state transitions in AWS Step Functions.

Lambda runs our code on high-availability compute infrastructure and performs all the administration of the compute resources, including server and operating system maintenance, capacity provisioning and automatic scaling, code and security patch deployment, and code monitoring and logging. All we need to do is supply the code.

Now, lets’ start with building an API that will help a local movie rental shop in managing their available movies.

API architecture

The following diagram shows how the API Gateway and Lambda fit into the API architecture:

image1

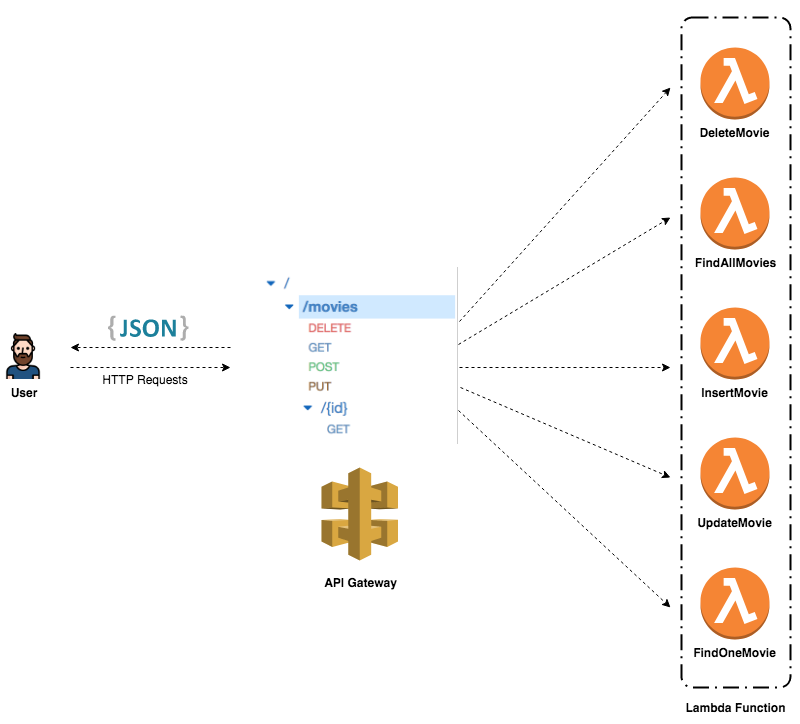
AWS Lambda empowers microservice development. That being said, each endpoint triggers a different Lambda function. These functions are independent of one another and can be written in different languages, thereby leading to scaling at function level, easier unit testing, and loose coupling.

All requests from clients first go through the API Gateway. It then routes the incoming request to the right Lambda function accordingly.

Note that a single Lambda function can Handle multiple HTTP methods (GET, POST, PUT, DELETE, and so on). It’s advisable to create multiple Lambda functions for each functionality in order to leverage the power of microservices. However, building a single Lambda function to handle multiple endpoints could be a good exercise.

Endpoints design

Now that the architecture has been defined, it’s time to go through the implementation of the functionalities described in the above diagram. Instead of hard coding the HTTP status code, you can use the net/http Go package and use a built-in status code variables such as http.StatusOK, http.StatusCreated, http.StatusBadRequest, http.StatusInternalServerError, and so on.

The GET method

The first feature to implement is listing movies. That’s where the GET method comes into play. Lets’ start with it following steps:

Step 1: Create a Lambda function that registers a findAll handler. This handler transforms a list of movies to a string and then returns this string wrapped by the APIGatewayProxyResponse variable along with a 200 HTTP status code. It also handles errors in case of conversion failure. The handler implementation is as follows:


package main

import (
"encoding/json"

"github.com/aws/aws-lambda-go/events"
"github.com/aws/aws-lambda-go/lambda"
)

var movies = []struct {
ID int `json:"id"`
Name string `json:"name"`
}{
{
ID: 1,
Name: "Avengers",
},
{
ID: 2,
Name: "Ant-Man",
},
{
ID: 3,
Name: "Thor",
},
{
ID: 4,
Name: "Hulk",
}, {
ID: 5,
Name: "Doctor Strange",
},
}

func findAll() (events.APIGatewayProxyResponse, error) {
response, err := json.Marshal(movies)
if err != nil {
return events.APIGatewayProxyResponse{}, err
}

return events.APIGatewayProxyResponse{
StatusCode: 200,
Headers: map[string]string{
"Content-Type": "application/json",
},
Body: string(response),
}, nil
}

func main() {
lambda.Start(findAll)
}

Instead of hard coding the HTTP status code, you can use the net/http Go package and use a built-in status code variables such as http.StatusOK, http.StatusCreated, http.StatusBadRequest, http.StatusInternalServerError, and so on.

Step 2: Create a script file with the following content to build a Lambda function deployment package, a .zip file consisting of your code and any dependencies, as follows:

#!/bin/bash

echo "Build the binary"
GOOS=linux GOARCH=amd64 go build -o main main.go

echo "Create a ZIP file"
zip deployment.zip main

echo "Cleaning up"
rm main

Step 3: Execute the following commands to build the deployment package as .zip file:

$ chmod +x build.sh
$ ./build.sh

Step 4: Configure AWS CLI using steps mentioned here. Once configured, create an AWS role with name as FindAllMoviesRole following the steps mentioned here and verify if it is successfully created:

$ aws iam get-role --role-name FindAllMoviesRole

Above command should give the response as shown in a screenshot below:

Image15

Step 5: Next, create a new Lambda function using the AWS CLI as follows:

aws lambda create-function --function-name FindAllMovies \
--zip-file fileb://deployment.zip \
--runtime go1.x --handler main \
--role arn:aws:iam::ACCOUNT_ID:role/FindAllMoviesRole \
--region us-east-1

Once function is created it will give us the output same as shown in a screenshot below:

Image16.PNG

Step 6: Heading back to the AWS Lambda Console, you should see that the function has been created successfully:

image2

Step 7: Create a sample event with an empty JSON, as the function doesn’t expect any argument, and click on the Test button:

image3.png

You will notice in the previous screenshot that the function returns the expected output in a JSON format.

Step 8: Now that the function has been defined, you need to create a new API Gateway in order to trigger it:

image4

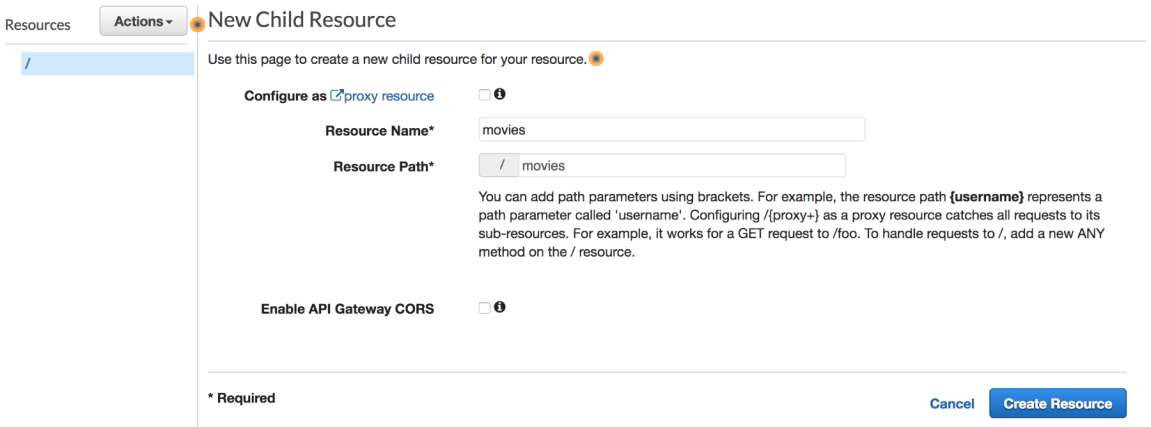
Step 9: Next, from the Actions drop-down list, select Create resource and name it movies:

image5

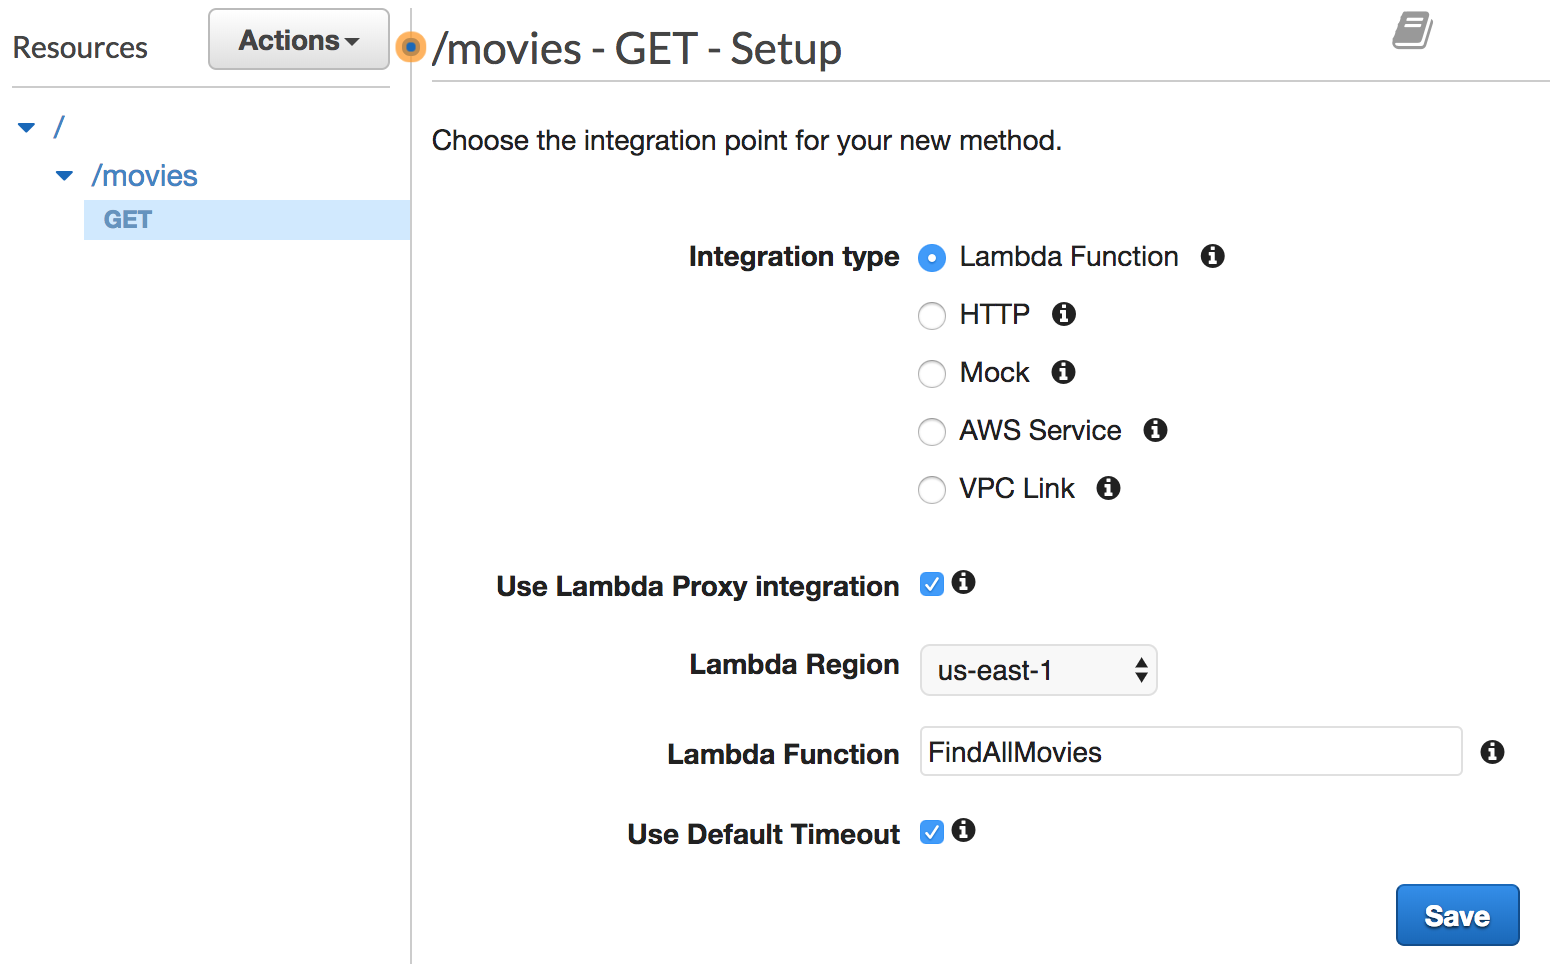
Step 10: Expose a GET method on this /movies resource by clicking on Create Method. Choose Lambda Function under the Integration type section and select the FindAllMovies function:

image6.png

Step 11: To deploy the API, select Deploy API from the Actions drop-down list. You’ll be prompted to create a new deployment stage:

image7

Step 12: Once the deployment stage is created, an invocation URL will be displayed:

image8

Step 13: Point your browser to the URL given or use a modern REST client like Postman or Insomnia. You can go with the cURL tool as it is installed by default on almost all operating systems:

curl -sX GET https://51cxzthvma.execute-api.us-east-1.amazonaws.com/staging/movies | jq '.'

The above command will return a list of movies in a JSON format:

image9

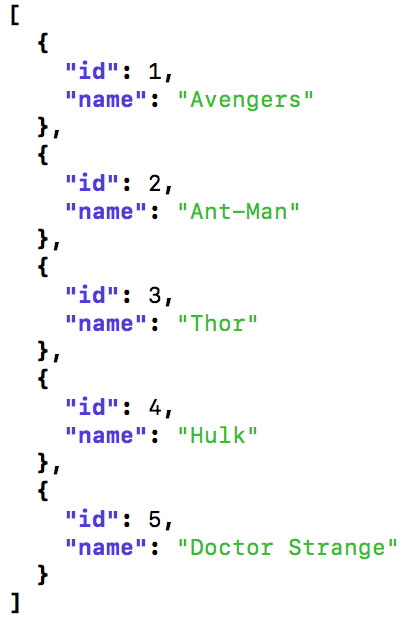
When calling the GET endpoint, the request will go through the API Gateway, which will trigger the findAll handler. This returns a response proxied by the API Gateway to the client in a JSON format.

Now that the findAll function has been deployed, you can implement a findOne function to search for a movie by its ID.

The GET method with parameters

The findOne handler expects the APIGatewayProxyRequest argument that contains the event input. Then, it uses the PathParameters method to get the movie ID and validate it.

If the ID provided is not a valid number, the Atoi method will return an error, and a 500 error code will be returned to the client. Otherwise, a movie will be fetched based on the index and returned to the client with a 200 OK status wrapped in APIGatewayProxyResponse:


...

func findOne(req events.APIGatewayProxyRequest) (events.APIGatewayProxyResponse, error) {

  id, err := strconv.Atoi(req.PathParameters["id"])

  if err != nil {

    return events.APIGatewayProxyResponse{

      StatusCode: 500,

      Body:       "ID must be a number",

    }, nil

  }

  response, err := json.Marshal(movies[id-1])

  if err != nil {

    return events.APIGatewayProxyResponse{

      StatusCode: 500,

      Body:       err.Error(),

    }, nil

  }

  return events.APIGatewayProxyResponse{

    StatusCode: 200,

    Headers: map[string]string{

      "Content-Type": "application/json",

    },

    Body: string(response),

  }, nil

}

func main() {

  lambda.Start(findOne)

}

Similar to the FindAllMovies function, create a new Lambda function for searching for a movie:

aws lambda create-function --function-name FindOneMovie \
--zip-file fileb://deployment.zip \
--runtime go1.x --handler main \
--role arn:aws:iam::ACCOUNT_ID:role/FindOneMovieRole \
--region us-east-1

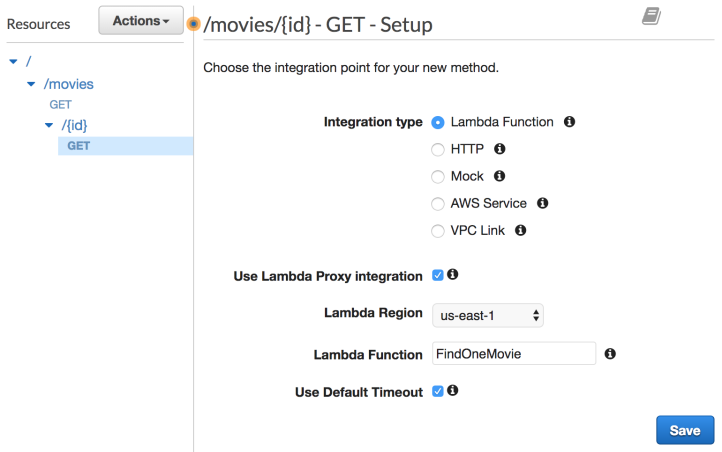
Go back to API Gateway console, create a new resource, expose the GET method, and then link the resource to the FindOneMovie function. Note the use of the {id} placeholder in the path. The value of id will be made available via the APIGatewayProxyResponse object. The following screenshot depicts this:

image10.png

Redeploy the API and use the following cURL command to test the endpoint:

curl -sX https://51cxzthvma.execute-api.us-east-1.amazonaws.com/staging/movies/1 | jq '.'

The following JSON will be returned:

image11

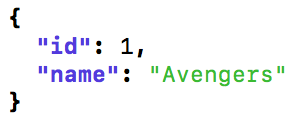
When the API URL is invoked with an ID, the movie corresponding to the ID is returned if it exists.

The POST method

Now you know how the GET method works with and without path parameters. The next step is to pass a JSON payload to a Lambda function through the API Gateway. The code is self-explanatory. It converts the request input to a movie structure, adds it to the list of movies, and returns the new list of movies in a JSON format:


package main

import (
"encoding/json"
"strconv"
"github.com/aws/aws-lambda-go/events"
"github.com/aws/aws-lambda-go/lambda"
)

type Movie struct {
ID int `json:"id"`
Name string `json:"name"`
}

var movies = []Movie{
Movie{
ID: 1,
Name: "Avengers",
},
...
}

func insert(req events.APIGatewayProxyRequest) (events.APIGatewayProxyResponse, error) {
var movie Movie
err := json.Unmarshal([]byte(req.Body), &movie)
if err != nil {
return events.APIGatewayProxyResponse{
StatusCode: 400,
Body: "Invalid payload",
}, nil
}

movies = append(movies, movie)

response, err := json.Marshal(movies)
if err != nil {
return events.APIGatewayProxyResponse{
StatusCode: 500,
Body: err.Error(),
}, nil
}

return events.APIGatewayProxyResponse{
StatusCode: 200,
Headers: map[string]string{
"Content-Type": "application/json",
},
Body: string(response),
}, nil
}

func main() {
lambda.Start(insert)
}

Next, create a new Lambda function for InsertMovie with the following command:

aws lambda create-function --function-name InsertMovie \
--zip-file fileb://deployment.zip \
--runtime go1.x --handler main \
--role arn:aws:iam::ACCOUNT_ID:role/InsertMovieRole \
--region us-east-1

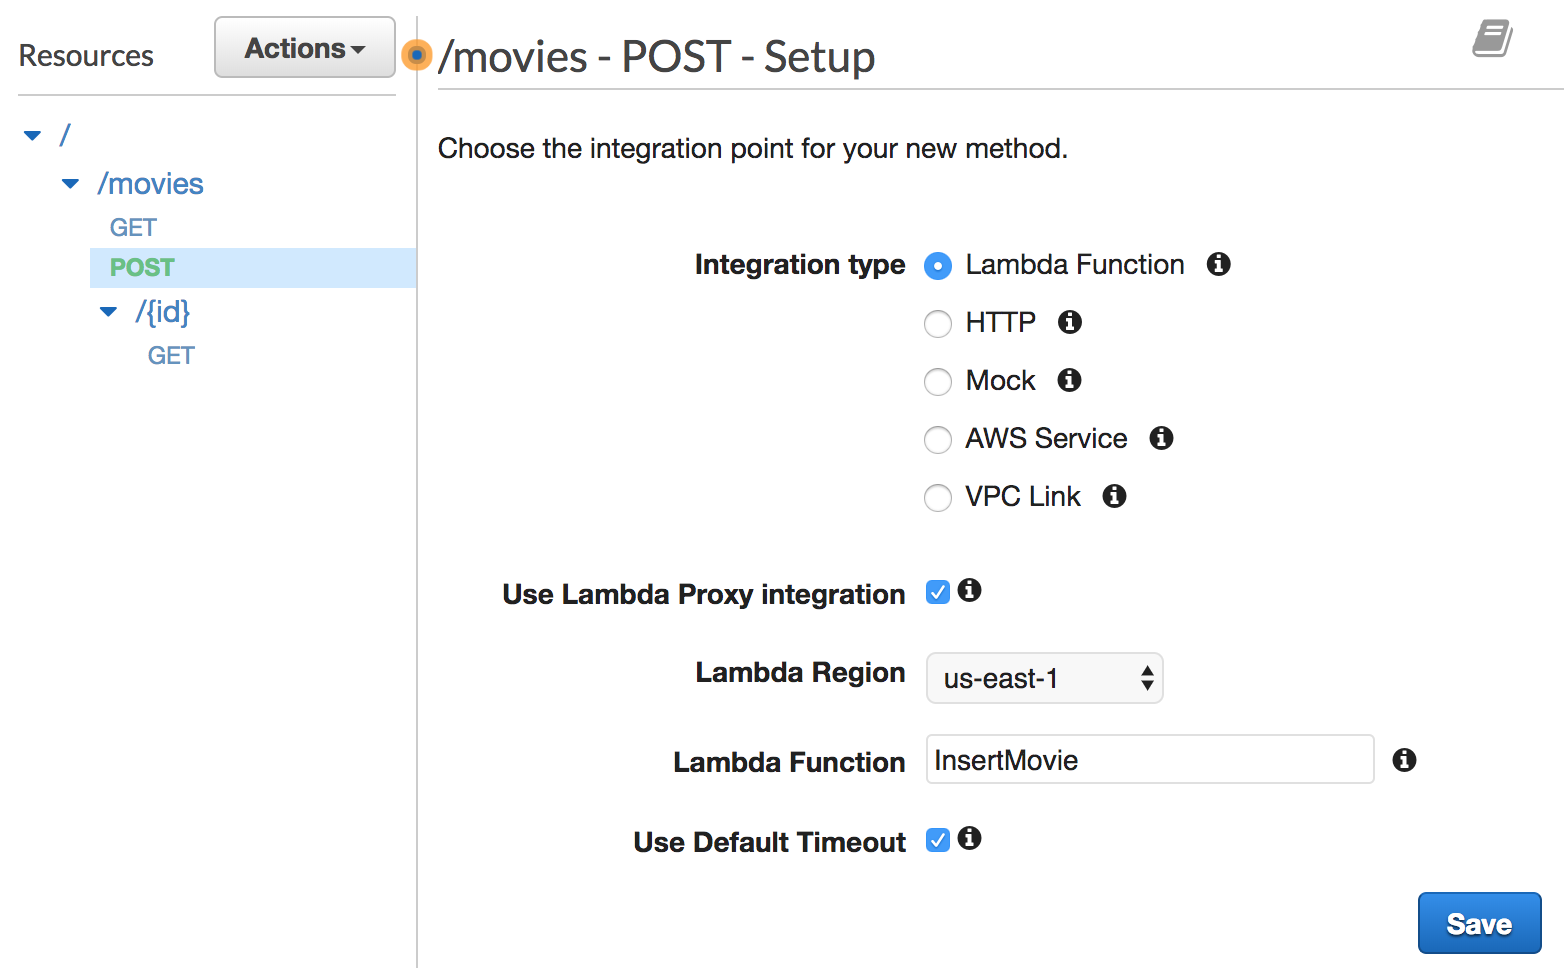
Next, create a POST method on the /movies resource and link it to the InsertMovie function:

image12.png

To test it out, use the following cURL command with the POST verb and the -d flag, followed by a JSON string (with the id and name attributes):

curl -sX POST -d '{"id":6, "name": "Spiderman:Homecoming"}' https://51cxzthvma.execute-api.us-east-1.amazonaws.com/staging/movies | jq '.'

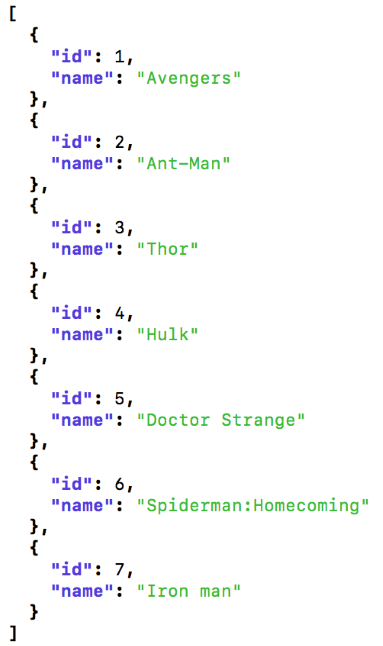
The above command will return the following JSON response:

image13.png

As you can see, the new movie has been inserted successfully. If you test it again, it should work as expected:

curl -sX POST -d '{"id":7, "name": "Iron man"}' https://51cxzthvma.execute-api.us-east-1.amazonaws.com/staging/movies | jq '.'

The preceding command will return the following JSON response:

image14.png

As you can see, it was successful and the movie was again inserted as expected, but what if you wait few minutes and try to insert a third movie? The following command will be used to execute it again:

curl -sX POST -d '{"id":8, "name": "Captain America"}' https://51cxzthvma.execute-api.us-east-1.amazonaws.com/staging/movies | jq '.'

Once again, a new JSON response will be returned:

image15

You will find that the movies with IDs 6 and 7 have been removed; why did this happen?  It’s simple. Lambda functions are stateless.

When the InsertMovie function is invoked for the first time (first insert), AWS Lambda creates a container and deploys the function payload to the container. Then, it remains active for a few minutes before it is terminated (warm start), which explains why the second insert passed. In the third insert, the container is already terminated, and hence Lambda creates a new container (cold start) to handle the insert.

This is why the previous state is lost. The following diagram illustrates the cold/warm start issue:

image16.png

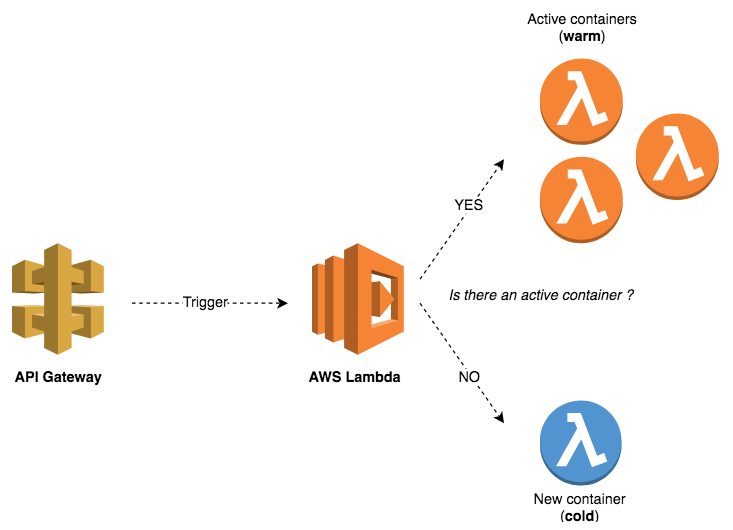
This explains why Lambda functions should be stateless and why you should not make any assumptions that the state will be preserved from one invocation to the next.

If you found this article helpful and want to learn more about Go, you can explore Hands-On Serverless Applications with Go written by Mohamed Labouardy, an AWS solution architect, and tech-reviewed by yours truly, this book will take you on a journey of learning the serverless architecture with Go and help you build highly modern, scalable, and efficient software applications.

Complete source code is hosted on github.

Writing RESTful Service using Node, Express and MongoDB

Looking at the popularity of Node.js, I thought of learning and creating a rest api that should create, delete and get employees from database and fortunately I did it.

With this post, I will try to replicate the steps I followed while writing it along with references.

Assuming Node.js is already installed in our system, let’s start creating nodejs-rest-api, following below steps:

Step 1: Create a directory which will contain all the files related to our app, for me it’s /Users/ArpitAggarwal/nodejs-rest-api and execute npm init:

$ cd /Users/ArpitAggarwal/
$ mkdir nodejs-rest-api
$ npm init

npm init command specified above will create package.json which helps us to manage dependencies.

Step 2: Install Express as a dependency:

$ cd /Users/ArpitAggarwal/nodejs-rest-api/
$ npm install --save express

Step 3: Create default entry point for Node.js i.e server.js, inside the same directory we created earlier:

$ cd /Users/ArpitAggarwal/nodejs-rest-api/
$ touch server.js

Copy below content in server.js:

const express = require('express');
const app = express();

app.listen(9999, function() {
console.log('Node server listening on 9999')
})

app.use(express.static(__dirname + '/public'));

Let’s understand what does each line mean.

require – imports modules into the current file.
const express = require(‘express’) – Creates an Express application.
const app = express() – Is app object conventionally denotes the Express application.
app.listen(9999) – Starts a UNIX socket and listens for connections on the given path.
app.use(express.static(__dirname + ‘/public’)) – Express serve static content for the app from the “public” directory in the application directory.

Step 4: Create index.html inside directory /Users/ArpitAggarwal/nodejs-rest-api/public as follows:

$ cd /Users/ArpitAggarwal/nodejs-rest-api/
$ mkdir public
$ cd public
$ touch index.html

Copy below content in index.html:

Hello Node!

Step 5: Modify server.js to add GET mapping to display the index.html we just created:

app.get('/', function(req, res){
res.sendFile('/index.html')
});

Step 6: Move to directory /Users/ArpitAggarwal/nodejs-rest-api and start the app following below command:

$ cd /Users/ArpitAggarwal/nodejs-rest-api
$ node server.js

Now, opening http://localhost:9999/ in browser or executing command:

curl http://localhost:9999

will show us “Hello Node!” as response.

Step 7: Now, we will install MongoDB as a dependency moving to the directory /Users/ArpitAggarwal/nodejs-rest-api/:

$ cd /Users/ArpitAggarwal/nodejs-rest-api/
$ npm install --save mongodb

Step 8: Create config.js which will store all the configurable parameters of the app like username, password, urls, etc. It basically helps us to specify the input to an app at runtime based on different environments on which we are going to run the app:

$ cd /Users/ArpitAggarwal/nodejs-rest-api/
$ touch config.js

Copy the below content in config.js:

var config = {};

config.mongodb = {};
config.server = {};

config.server.port = process.env.WEB_PORT || 9999;

config.mongodb.username = process.env.MONGODB_USERNAME || 'arpit';
config.mongodb.password= process.env.MONGODB_PASSWORD || 'xxxx';
config.mongodb.host= process.env.MONGODB_HOST || 'ds047752.mlab.com';
config.mongodb.port = process.env.MONGODB_PORT || 47752;
config.mongodb.databaseName = process.env.MONGODB_NAME || 'my-database';

module.exports = config;

Do replace the properties with your’s or export from command line before starting the app, for example:

$ cd /Users/ArpitAggarwal/nodejs-rest-api/
$ export MONGODB_PASSWORD = p@ssword
$ node server.js

Step 9: Create mongodb.js where we will define MongoClient and export the connection to database as well as database object to utilize in a non redundant fashion while defining at one place, as follows:

$ cd /Users/ArpitAggarwal/nodejs-rest-api/
$ touch mongodb.js

Copy the below content in mongodb.js:


var MongoClient = require( 'mongodb' ).MongoClient;
var util = require('util');
var config = require('./config');
var _db;

var uri = util.format('mongodb://%s:%s@%s:%d/%s',
config.mongodb.username, config.mongodb.password, config.mongodb.host, config.mongodb.port, config.mongodb.databaseName);

module.exports = {
connectToServer: function( callback ) {
/** Connect to the Mongo database at the URI using the client **/
MongoClient.connect( uri, { auto_reconnect: true }, function( err, db ) {
if (err) throw err;
else if (!db) console.log('Unknown error connecting to database');
else {
console.log('Connected to MongoDB database server at:');
console.log('\n\t%s\n', uri);
_db = db;
}
return callback( err );
} );
},
getDb: function() {
return _db;
}
};

require( ‘mongodb’ ).MongoClient specified above create a new MongoClient instance.

var config = require(‘./config’) – Imports config.js into the current file.

Step 10: Now let’s modify server.js to use the above two files we just created and setting up the server to listen on specified port only when MongoDB connection is successful:

const mongodb = require('./mongodb.js');
const config = require('./config.js');
var db

mongodb.connectToServer( function( err ) {
app.listen(config.server.port, function() {
console.log('Node server listening on ' + config.server.port);
db = mongodb.getDb();
})
});

Step 11: Next, modify GET request in server.js to get the list of employees from database using the MongoClient we just created, as follows:

app.get('/employee/get', function(req, res){
db.collection('employees').find().toArray(function(err, results) {
res.send(results);
})
res.set({
'Cache-Control': 'no-cache'
});
});

Executing the below command will list all the employees we create:

$ curl http://localhost:9999/employee/get

Step 12: Moving further to extend our app to create employee in a database by adding POST request. But, before introducing POST request we have to install body-parser as a node dependency which will help in parsing incoming request bodies in a middleware, as follows:

$ cd /Users/ArpitAggarwal/nodejs-rest-api/
$ npm install --save body-parser

Same like other dependencies we have to import it using require keyword to leverage the capability for parsing the JSON request, as follows:

const bodyParser= require('body-parser')

app.use(bodyParser.json())

app.post('/employee/create', (req, res) => {
db.collection('employees').save(req.body, (err, result) => {
if (err) return console.log(err)
res.send('Employee created!');
})
})

Now everything is in place for POST, let’s create an employee:

$ curl -H "Content-Type: application/json" -X POST -d '{"name": "Arpit Aggarwal","email":"aggarwalarpit.89@gmail.com"}' http://localhost:9999/employee/create

Next, we will extend our app to delete an employee and to that we will define the DELETE mapping in server.js, as follows:

app.delete('/employee/delete', (req, res) => {
db.collection('employees').findOneAndDelete({name: req.body.name},
(err, result) => {
if (err) return res.send(500, err)
res.send('Employee deleted!')
})
})

Let’s verify DELETE call:

curl -H "Content-Type: application/json" -X DELETE -d '{"name": "Arpit Aggarwal"}' http://localhost:9999/employee/delete

Tired of restarting the Node.js server everytime you make changes to app?

If yes, we can use Nodemon, a utility that will monitor for any changes in our source and automatically restart our server. Let’s install it globally:

$ npm install -g nodemon

Once installed, we have to start our app with nodemon instead of node, for example:

$ cd /Users/ArpitAggarwal/nodejs-rest-api/
$ nodemon server.js

Complete source code is hosted on github.

Reference: http://expressjs.com/en/api.html#express

Working with Glide – Vendor Package Management for Go

In this post, we will use Glide to manage the dependencies of a Go project. Before starting, let me give you a brief introduction about Glide.

What is Glide?
Glide is a package manager for Go that is conceptually similar to package managers for other languages such as NPM for Node.js, Pip for Python, and so forth which records dependency information in a glide.yaml file and utilizes vendor/ directories, so that different projects can have different versions of the same dependencies.

Now, lets’ start with creating a small project with a single Go file which will give colourized outputs, following steps:

Step 1: Install Glide executing the following command:

$ curl https://glide.sh/get | sh

Above command will add glide binary in $GOPATH/bin.

Step 2: Move to $GOPATH/src to create a directory – golang-glide-example executing the following command:

$ cd $GOPATH/src && mkdir golang-glide-example

Step 3: Move to $GOPATH/src/golang-glide-example to create a Go file which will give colourized outputs executing the following command:

$ cd $GOPATH/src/golang-glide-example && touch color.go

Step 4: Copy the following code to color.go:

package main

import (
“github.com/fatih/color”
)

func main() {
color.Red(“We have red”)
color.Blue(“Prints %s in blue.”, “text”)
}

Step 5: Move to $GOPATH/src/golang-glide-example and execute the following command:

$ cd $GOPATH/src/golang-glide-example && glide init –non-interactive

Above command will create glide.yaml which contain all the dependencies to run the project.

Step 6: Move to $GOPATH/src/golang-glide-example, install all dependencies and build the project executing the following command:

$ cd $GOPATH/src/golang-glide-example && glide install && go build

Above command will download and export the dependencies and the output logs will look like as shown in a screenshot below:

Screen Shot 2018-04-14 at 12.20.06 PM

Step 7: Move to $GOPATH/src/golang-glide-example and Run golang-glide-example executing following command:

$ cd $GOPATH/src/golang-glide-example && ./golang-glide-example

which will give us the colourized output same as shown in a screenshot below:

Screen Shot 2018-04-14 at 12.20.24 PM

The complete source code is hosted on GitHub.

Rendering RESTful service with React

Looking at the popularity of React, I thought of learning it and creating a simple UI which will render data from RESTful service.

With this post, I will try to replicate the steps I followed while writing it along with references. Before starting, let me give you a brief introduction about React.

What is React?

React is a declarative, efficient, and flexible JavaScript library for building user interfaces. It uses virtual DOM which improve apps performance since JavaScript virtual DOM is faster than the regular DOM with a limitation that it only covers view layer of the app so you still need to choose other technologies to get a complete tooling set for development.

Now, lets’ start with creating react-app running on port 8080, following below steps:

Step 1: Go to start.spring.io and create a new project react-app adding the Thymeleaf starters, based on the following image:

Screen Shot 2017-05-06 at 2.53.30 pm.png
Step 2: Edit ReactAppApplication.java to add a method which returns a list of employee, as follows:

package com.arpit.react.app;

import java.util.ArrayList;
import java.util.List;
import org.springframework.boot.SpringApplication;
import org.springframework.boot.autoconfigure.SpringBootApplication;
import org.springframework.stereotype.Controller;
import org.springframework.web.bind.annotation.GetMapping;
import org.springframework.web.bind.annotation.RestController;

@SpringBootApplication
@RestController
public class ReactAppApplication {

public static void main(String[] args) {
SpringApplication.run(ReactAppApplication.class, args);
}

@GetMapping("/employee/get")
public List<Employee> get() {
List<Employee> employeeList = new ArrayList<>();
employeeList.add(new Employee(1, "Arpit", "IT"));
employeeList.add(new Employee(2, "Sanjeev", "IT"));
return employeeList;
}
}

@Controller
class IndexPageController {

@GetMapping(value = "/")
public String index() {
return "index";
}
}

final class Employee {

private int id;
private String name;
private String department;

public Employee() {

}

public Employee(final int id, final String name, final String department) {
this.id = id;
this.name = name;
this.department = department;
}

public int getId() {
return id;
}

public void setId(int id) {
this.id = id;
}

public String getName() {
return name;
}

public void setName(String name) {
this.name = name;
}

public String getDepartment() {
return department;
}

public void setDepartment(String department) {
this.department = department;
}
}

IndexPageController define index() method flagged by @GetMapping(value = “/”) to support the / route. It returns index as the name of the template, which Spring Boot’s autoconfigured view resolver will map to src/main/resources/templates/index.html.

Step 3: Define an HTML template src/main/resources/templates/index.html with the following content:

<!DOCTYPE html>
<html xmlns:th="http://www.thymeleaf.org">
<head lang="en">
<meta charset="UTF-8" />
<title>React with Spring REST</title>
</head>
<body>
<div id="react"></div>
<script src="package/script.js"></script>
</body>
</html>

Step 4: Move to react-app directory and run command: mvn spring-boot:run. Once running open http://localhost:8080/employee/get which will give you the list of employees we are going to render on UI built with React.

Step 5: Next we will add frontend-maven-plugin in pom.xml  to install Node and NPM locally for the react-app followed by running Webpack  build, as follows:

<plugin>
<groupId>com.github.eirslett</groupId>
<artifactId>frontend-maven-plugin</artifactId>
<version>1.2</version>
<configuration>
<installDirectory>target</installDirectory>
</configuration>
<executions>
<execution>
<id>install node and npm</id>
<goals>
<goal>install-node-and-npm</goal>
</goals>
<configuration>
<nodeVersion>v4.4.5</nodeVersion>
<npmVersion>3.9.2</npmVersion>
</configuration>
</execution>
<execution>
<id>npm install</id>
<goals>
<goal>npm</goal>
</goals>
<configuration>
<arguments>install</arguments>
</configuration>
</execution>
<execution>
<id>webpack build</id>
<goals>
<goal>webpack</goal>
</goals>
</execution>
</executions>
</plugin>

Step 6: Execute npm init in the root directory to create package.json in which we specify all the dependencies required to build our react-app like React, React DOM, Webpack, Babel Loader, Babel Core, Babel Preset: ES2015, Babel Preset: React, as follows:

$ cd react-app
$ touch npm init

Copy the following content:

{
"name": "react-app",
"version": "1.0.0",
"description": "Rendering RESTful service with React",
"repository": {
"type": "git",
"url": "git@github.com:arpitaggarwal/react-app.git"
},
"keywords": [
"rest",
"spring",
"react"
],
"author": "Arpit Aggarwal",
"dependencies": {
"axios": "^0.16.1",
"react": "^15.3.2",
"react-dom": "^15.3.2",
"webpack": "^1.12.2"
},
"scripts": {
"watch": "webpack --watch -d"
},
"devDependencies": {
"babel-core": "^6.18.2",
"babel-loader": "^6.2.7",
"babel-polyfill": "^6.16.0",
"babel-preset-es2015": "^6.18.0",
"babel-preset-react": "^6.16.0"
}
}

Step 7: Next we will create webpack.config.js to configure webpack, as follows:

$ cd react-app
$ touch webpack.config.js

Copy the following content:

var path = require('path');

module.exports = {
entry: './app/main.js',
cache: true,
debug: true,
output: {
path: __dirname,
filename: './src/main/resources/static/package/script.js'
},
module: {
loaders: [
{
test: path.join(__dirname, '.'),
exclude: /(node_modules)/,
loader: 'babel',
query: {
cacheDirectory: true,
presets: ['es2015', 'react']
}
}
]
}
};

entry option specified above is the entry point for the bundle.
cache option specified above Cache generated modules and chunks to improve performance for multiple incremental builds.
output option specified above tell Webpack how to write the compiled files to disk.

For more configuration options you can explore here.

Step 8: Next we will create entry point for the webpack which is react-app/app/main.js, as:

$ cd react-app
$ mkdir app
$ cd app
$ touch main.js

Copy the following content:

'use strict';
const React = require('react');
const ReactDOM = require('react-dom')

import ReactApp from './components/react-app.jsx'

ReactDOM.render(
<ReactApp />,
document.getElementById('react')
)

React is the main library from Facebook for building the app.
ReactDOM provides DOM-specific methods that can be used at the top level.
ReactApp is the top level container for all React components.

Let’s define ReactApp along with it’s child components, as:

$ cd react-app/app/
$ mkdir components
$ cd components
$ touch react-app.jsx employee-list.jsx employee.jsx

react-spring/app/components/react-app.jsx

'use strict';
const React = require('react');
var axios = require('axios');

import EmployeeList from './employee-list.jsx'

export default class ReactApp extends React.Component {

constructor(props) {
super(props);
this.state = {employees: []};
this.Axios = axios.create({
baseURL: "/employee",
headers: {'content-type': 'application/json', 'creds':'user'}
});
}

componentDidMount() {
let _this = this;
this.Axios.get('/get')
.then(function (response) {
console.log(response);
_this.setState({employees: response.data});
})
.catch(function (error) {
console.log(error);
});
}

render() {
return (
<div>
<EmployeeList employees={this.state.employees}/>
</div>
)
}
}

react-spring/app/components/employee-list.jsx

const React = require('react');
import Employee from './employee.jsx'

export default class EmployeeList extends React.Component{

render() {
var employees = this.props.employees.map((employee, i) =>
<Employee key={i} employee={employee}/>
);

return (
<table>
<tbody>
<tr>
<th>ID</th>
<th>Name</th>
<th>Department</th>
</tr>
{employees}
</tbody>
</table>
)
}
}

react-spring/app/components/employee.jsx

const React = require('react');

export default class Employee extends React.Component{
render() {
return (
<tr>
<td>{this.props.employee.id}</td>
<td>{this.props.employee.name}</td>
<td>{this.props.employee.department}</td>
</tr>
)
}
}

With all this in place, your directory structure should look like:

Screen Shot 2017-05-06 at 4.49.26 pm

Now re-run the application and visit http://localhost:8080.

Complete source code is hosted on github.

Microservices fault and latency tolerance using Netflix Hystrix

Recently in one of my project I got a requirement to execute a fallback call for a failing webservice call. To implement the same I was looking for some implementation of circuit breaker pattern and finally came across Netflix Hystrix library which I found is the best suited library as per our application.

In this post I tried to showcase a thin example of our problem and how Hystrix solved the same using a single microservice and a client to access it along with Hystrix Dashboard. Before diving into coding, let’s understand in brief what Hystrix is and how it works internally.

What is Hystrix?

Hystrix is a library that helps us control the interactions between the distributed services by adding latency tolerance and fault tolerance logic. It does this by isolating points of access between the services, stopping cascading failures across them, and providing fallback options, all of which improve our system’s overall resiliency.

It implements the circuit breaker pattern which work on circuit-breaker transitions from CLOSED to OPEN when a circuit meets a specified threshold and error percentage exceeds the threshold error percentage. While it is open, it short-circuits all requests made against that circuit-breaker. After some amount of time, the next single request is let through (this is the HALF-OPEN state). If the request fails, the circuit-breaker returns to the OPEN state for the duration of the sleep window. If the request succeeds, the circuit-breaker transitions to CLOSED and all requests made against that circuit-breaker are passed through to the service. More you can explore here.

Now, let’s start creating employee-service microservice running on port 8090 and client to access the same along with Hystrix Dashboard following below steps:

Step 1: Go to start.spring.io and create a new project employee-service adding the Web starters, based on the following image:

screen-1

Step 2: Edit EmployeeServiceApplication.java to add a method which returns a list of employee, as follows:

import org.springframework.boot.SpringApplication;
import org.springframework.boot.autoconfigure.SpringBootApplication;
import org.springframework.web.bind.annotation.RequestMapping;
import org.springframework.web.bind.annotation.RestController;

@SpringBootApplication
@RestController
public class EmployeeServiceApplication {

public static void main(String[] args) {
SpringApplication.run(EmployeeServiceApplication.class, args);
}

@RequestMapping(value = "/list")
public String list() {
return "Arpit, Sanjeev, Abhishek";
}
}

Step 3: Edit application.properties to specify the application name and port number of a service, as follows:

server.port=8090
spring.application.name=employee-service

Step 4: Move to employee-service directory and run command: mvn spring-boot:run. Once running, open http://localhost:8090/list.

Next, we will create hystrix-client which will access our newly created employee-service and if it is down will return the response from fallback method.

Step 5: Go to start.spring.io and create a new project hystrix-client adding the Web, Hystrix and Actuator starters, based on the following image:

screen-2


Step 6: Edit HystrixClientApplication.java to add a method which calls employee-service to get a response and if service is down or unavailable because of any reason return a response from fallback method, as follows:

import org.springframework.beans.factory.annotation.Autowired;
import org.springframework.boot.SpringApplication;
import org.springframework.boot.autoconfigure.SpringBootApplication;
import org.springframework.cloud.client.circuitbreaker.EnableCircuitBreaker;
import org.springframework.cloud.netflix.hystrix.EnableHystrix;
import org.springframework.context.annotation.Bean;
import org.springframework.context.annotation.ComponentScan;
import org.springframework.context.support.PropertySourcesPlaceholderConfigurer;
import org.springframework.web.bind.annotation.RequestMapping;
import org.springframework.web.bind.annotation.RestController;
import org.springframework.web.servlet.config.annotation.WebMvcConfigurerAdapter;

import com.test.service.IEmployeeService;

@EnableHystrix
@EnableCircuitBreaker
@SpringBootApplication
@RestController
@ComponentScan(basePackages = { "com.test.service" })
public class HystrixClientApplication {

@Autowired
private IEmployeeService employeeService;

public static void main(String[] args) {
SpringApplication.run(HystrixClientApplication.class, args);
}

@RequestMapping("/list")
public String list() {
return employeeService.list();
}

static class ApplicationConfig extends WebMvcConfigurerAdapter {

@Bean
public static PropertySourcesPlaceholderConfigurer propertySourcesPlaceholderConfigurer() {
return new PropertySourcesPlaceholderConfigurer();
}
}
}

Step 7: Create interface IEmployeeService and it’s implementation class EmployeeServiceImpl under com.test.service package and edit them as follows:

IEmployeeService.java

package com.test.service;

public interface IEmployeeService {
String list();
}

EmployeeServiceImpl.java

package com.test.service.impl;

import java.net.URI;

import org.springframework.beans.factory.annotation.Value;
import org.springframework.stereotype.Service;
import org.springframework.web.client.RestTemplate;

import com.netflix.hystrix.contrib.javanica.annotation.HystrixCommand;
import com.netflix.hystrix.contrib.javanica.annotation.HystrixProperty;
import com.test.service.IEmployeeService;

@Service
public class EmployeeServiceImpl implements IEmployeeService {

@Value("#{'${employee.service.url}'}")
private String employeeServiceUrl;

@HystrixCommand(commandProperties = {
@HystrixProperty(name = "execution.isolation.strategy", value = "THREAD"),
@HystrixProperty(name = "execution.timeout.enabled", value = "true"),
@HystrixProperty(name = "execution.isolation.thread.timeoutInMilliseconds", value = "500"),
@HystrixProperty(name = "execution.isolation.thread.interruptOnTimeout", value = "true"),
@HystrixProperty(name = "fallback.enabled", value = "true"),
@HystrixProperty(name = "circuitBreaker.enabled", value = "true"),
@HystrixProperty(name = "circuitBreaker.requestVolumeThreshold", value = "10"),
@HystrixProperty(name = "circuitBreaker.sleepWindowInMilliseconds", value = "1000"),
@HystrixProperty(name = "circuitBreaker.errorThresholdPercentage", value = "10"),
@HystrixProperty(name = "circuitBreaker.forceOpen", value = "false"),
@HystrixProperty(name = "circuitBreaker.forceClosed", value = "false") }, fallbackMethod = "fallback", commandKey = "list", groupKey = "EmployeeServiceImpl", threadPoolKey = "thread-pool-employee-service", threadPoolProperties = { @HystrixProperty(name = "coreSize", value = "5") }, ignoreExceptions = { IllegalAccessException.class })
public String list() {
RestTemplate restTemplate = new RestTemplate();
URI uri = URI.create(employeeServiceUrl + "/list");
return restTemplate.getForObject(uri, String.class);
}

public String fallback() {
return "Fallback call, seems employee service is down";
}
}

@HystrixCommand specified above is used to wrap code that will execute potentially risky functionality with fault and latency tolerance, statistics and performance metrics capture, circuit breaker and bulkhead functionality.

@HystrixProperty specified above is used to control HystrixCommand behavior. All available options are listed here.

Step 8: Edit application.properties to specify the application port on which hystrix-client should be running and url on which employee-service is available, as follows:

server.port=8080
employee.service.url=http://localhost:8090

Step 9: Move to hystrix-client directory and run command: mvn spring-boot:run. Once running, open http://localhost:8080/list.

Is Hystrix working?

Shut down the employee-service application. Fallback message should be seen : Fallback call, seems employee service is down.

Next, we will create Hystrix Dashboard which will provide us the graphical view of success and failure requests, circuit status, host, cluster and thread pool status of an application.

Step 10: Go to start.spring.io and create a new project hystrix-dashboard adding the Hystrix Dashboard starters. Once created edit HystrixDashboardApplication.java, as follows:

import org.springframework.boot.SpringApplication;
import org.springframework.boot.autoconfigure.SpringBootApplication;
import org.springframework.cloud.netflix.hystrix.dashboard.EnableHystrixDashboard;

@SpringBootApplication
@EnableHystrixDashboard
public class HystrixDashboardApplication {

public static void main(String[] args) {
SpringApplication.run(HystrixDashboardApplication.class, args);
}
}

Step 11: Edit application.properties to specify the application port on which hystrix-dashboard should be running, as follows:

server.port=8383

Step 12: Move to hystrix-dashboard directory and run command: mvn spring-boot:run. Once running, open http://localhost:8383/hystrix and enter http://localhost:8080/hystrix.stream in stream textbox and click Monitor Stream. Once dashboard is loaded we will see image similar to below:

screen-3

The complete source code is hosted on github.

Writing and Consuming SOAP Webservice with Spring

In the era of RESTful Web Services, I got a chance to consume SOAP Web Service. To do the same I chosen Spring, reason being we are already using Spring as backend framework in our project and secondly it provides an intuitive way to interact service(s) with well-defined boundaries to promote reusability and portability through WebServiceTemplate.

Assuming you already know about SOAP Web Services, let’s start creating hello-world soap service running on port 9999 and client to consume the same, following below steps:

Step 1: Go to start.spring.io and create a new project soap-server adding the Web starters, based on the following image:

soap-server

Step 2: Edit SoapServerApplication.java to publish the hello-world service at Endpoint – http://localhost:9999/service/hello-world, as follows:


package com.arpit.soap.server.main;

import javax.xml.ws.Endpoint;

import org.springframework.beans.factory.annotation.Value;
import org.springframework.boot.CommandLineRunner;
import org.springframework.boot.SpringApplication;
import org.springframework.boot.autoconfigure.SpringBootApplication;

import com.arpit.soap.server.service.impl.HelloWorldServiceImpl;

@SpringBootApplication
public class SoapServerApplication implements CommandLineRunner {

@Value("${service.port}")
private String servicePort;

@Override
public void run(String... args) throws Exception {
Endpoint.publish("http://localhost:" + servicePort
+ "/service/hello-world", new HelloWorldServiceImpl());
}

public static void main(String[] args) {
SpringApplication.run(SoapServerApplication.class, args);
}
}

Step 3: Edit application.properties to specify the application name, port and port number of hello-world service, as follows:

server.port=9000
spring.application.name=soap-server

## Soap Service Port
service.port=9999

Step 4: Create additional packages as com.arpit.soap.server.service and com.arpit.soap.server.service.impl to define the Web Service and it’s implementation, as follows:

HelloWorldService.java

package com.arpit.soap.server.service;

import javax.jws.WebMethod;
import javax.jws.WebParam;
import javax.jws.WebService;

import com.arpit.soap.server.model.ApplicationCredentials;

@WebService
public interface HelloWorldService {

@WebMethod(operationName = "helloWorld", action = "https://aggarwalarpit.wordpress.com/hello-world/helloWorld")
String helloWorld(final String name,
@WebParam(header = true) final ApplicationCredentials credential);

}

@WebService specified above marks a Java class as implementing a Web Service, or a Java interface as defining a Web Service interface.

@WebMethod specified above marks a Java method as a Web Service operation.

@WebParam specified above customize the mapping of an individual parameter to a Web Service message part and XML element.

HelloWorldServiceImpl.java

package com.arpit.soap.server.service.impl;

import javax.jws.WebService;

import com.arpit.soap.server.model.ApplicationCredentials;
import com.arpit.soap.server.service.HelloWorldService;

@WebService(endpointInterface = "com.arpit.soap.server.service.HelloWorldService")
public class HelloWorldServiceImpl implements HelloWorldService {

@Override
public String helloWorld(final String name,
final ApplicationCredentials credential) {
return "Hello World from " + name;
}
}

Step 5: Move to soap-server directory and run command: mvn spring-boot:run. Once running, open http://localhost:9999/service/hello-world?wsdl to view the WSDL for the hello-world service.

Next, we will create soap-client which will consume our newly created hello-world service.

Step 6: Go to start.spring.io and create a new project soap-client adding the Web, Web Services starters, based on the following image:

soap-client.png

Step 7: Edit SoapClientApplication.java to create a request to hello-world web service, sending the same to soap-server along with header and get the response from it, as follows:


package com.arpit.soap.client.main;

import java.io.IOException;
import java.io.StringWriter;

import javax.xml.bind.JAXBElement;
import javax.xml.transform.Transformer;
import javax.xml.transform.TransformerException;
import javax.xml.transform.TransformerFactory;
import javax.xml.transform.stream.StreamResult;

import org.springframework.beans.factory.annotation.Autowired;
import org.springframework.beans.factory.annotation.Qualifier;
import org.springframework.beans.factory.annotation.Value;
import org.springframework.boot.CommandLineRunner;
import org.springframework.boot.SpringApplication;
import org.springframework.boot.autoconfigure.SpringBootApplication;
import org.springframework.context.annotation.ComponentScan;
import org.springframework.ws.WebServiceMessage;
import org.springframework.ws.client.core.WebServiceMessageCallback;
import org.springframework.ws.client.core.WebServiceTemplate;
import org.springframework.ws.soap.SoapMessage;
import org.springframework.xml.transform.StringSource;

import com.arpit.soap.server.service.ApplicationCredentials;
import com.arpit.soap.server.service.HelloWorld;
import com.arpit.soap.server.service.HelloWorldResponse;
import com.arpit.soap.server.service.ObjectFactory;

@SpringBootApplication
@ComponentScan("com.arpit.soap.client.config")
public class SoapClientApplication implements CommandLineRunner {

@Autowired
@Qualifier("webServiceTemplate")
private WebServiceTemplate webServiceTemplate;

@Value("#{'${service.soap.action}'}")
private String serviceSoapAction;

@Value("#{'${service.user.id}'}")
private String serviceUserId;

@Value("#{'${service.user.password}'}")
private String serviceUserPassword;

public static void main(String[] args) {
SpringApplication.run(SoapClientApplication.class, args);
System.exit(0);
}

public void run(String... args) throws Exception {
final HelloWorld helloWorld = createHelloWorldRequest();
@SuppressWarnings("unchecked")
final JAXBElement<HelloWorldResponse> jaxbElement = (JAXBElement<HelloWorldResponse>) sendAndRecieve(helloWorld);
final HelloWorldResponse helloWorldResponse = jaxbElement.getValue();
System.out.println(helloWorldResponse.getReturn());
}

private Object sendAndRecieve(HelloWorld seatMapRequestType) {
return webServiceTemplate.marshalSendAndReceive(seatMapRequestType,
new WebServiceMessageCallback() {
public void doWithMessage(WebServiceMessage message)
throws IOException, TransformerException {
SoapMessage soapMessage = (SoapMessage) message;
soapMessage.setSoapAction(serviceSoapAction);
org.springframework.ws.soap.SoapHeader soapheader = soapMessage
.getSoapHeader();
final StringWriter out = new StringWriter();
webServiceTemplate.getMarshaller().marshal(
getHeader(serviceUserId, serviceUserPassword),
new StreamResult(out));
Transformer transformer = TransformerFactory
.newInstance().newTransformer();
transformer.transform(new StringSource(out.toString()),
soapheader.getResult());
}
});
}

private Object getHeader(final String userId, final String password) {
final https.aggarwalarpit_wordpress.ObjectFactory headerObjectFactory = new https.aggarwalarpit_wordpress.ObjectFactory();
final ApplicationCredentials applicationCredentials = new ApplicationCredentials();
applicationCredentials.setUserId(userId);
applicationCredentials.setPassword(password);
final JAXBElement<ApplicationCredentials> header = headerObjectFactory
.createApplicationCredentials(applicationCredentials);
return header;
}

private HelloWorld createHelloWorldRequest() {
final ObjectFactory objectFactory = new ObjectFactory();
final HelloWorld helloWorld = objectFactory.createHelloWorld();
helloWorld.setArg0("Arpit");
return helloWorld;
}

}

Step 8: Next, create additional package com.arpit.soap.client.config to configure WebServiceTemplate, as follows:

ApplicationConfig.java

package com.arpit.soap.client.config;

import org.springframework.beans.factory.annotation.Value;
import org.springframework.context.annotation.Bean;
import org.springframework.context.annotation.Configuration;
import org.springframework.context.support.PropertySourcesPlaceholderConfigurer;
import org.springframework.oxm.jaxb.Jaxb2Marshaller;
import org.springframework.web.servlet.config.annotation.EnableWebMvc;
import org.springframework.web.servlet.config.annotation.WebMvcConfigurerAdapter;
import org.springframework.ws.client.core.WebServiceTemplate;
import org.springframework.ws.soap.saaj.SaajSoapMessageFactory;
import org.springframework.ws.transport.http.HttpComponentsMessageSender;

@Configuration
@EnableWebMvc
public class ApplicationConfig extends WebMvcConfigurerAdapter {

@Value("#{'${service.endpoint}'}")
private String serviceEndpoint;

@Value("#{'${marshaller.packages.to.scan}'}")
private String marshallerPackagesToScan;

@Value("#{'${unmarshaller.packages.to.scan}'}")
private String unmarshallerPackagesToScan;

@Bean
public static PropertySourcesPlaceholderConfigurer propertySourcesPlaceholderConfigurer() {
return new PropertySourcesPlaceholderConfigurer();
}

@Bean
public SaajSoapMessageFactory messageFactory() {
SaajSoapMessageFactory messageFactory = new SaajSoapMessageFactory();
messageFactory.afterPropertiesSet();
return messageFactory;
}

@Bean
public Jaxb2Marshaller marshaller() {
Jaxb2Marshaller marshaller = new Jaxb2Marshaller();
marshaller.setPackagesToScan(marshallerPackagesToScan.split(","));
return marshaller;
}

@Bean
public Jaxb2Marshaller unmarshaller() {
Jaxb2Marshaller unmarshaller = new Jaxb2Marshaller();
unmarshaller.setPackagesToScan(unmarshallerPackagesToScan.split(","));
return unmarshaller;
}

@Bean
public WebServiceTemplate webServiceTemplate() {
WebServiceTemplate webServiceTemplate = new WebServiceTemplate(
messageFactory());
webServiceTemplate.setMarshaller(marshaller());
webServiceTemplate.setUnmarshaller(unmarshaller());
webServiceTemplate.setMessageSender(messageSender());
webServiceTemplate.setDefaultUri(serviceEndpoint);
return webServiceTemplate;
}

@Bean
public HttpComponentsMessageSender messageSender() {
HttpComponentsMessageSender httpComponentsMessageSender = new HttpComponentsMessageSender();
return httpComponentsMessageSender;
}
}

Step 9: Edit application.properties to specify the application name, port and hello-world soap web service configurations, as follows:

server.port=9000
spring.application.name=soap-client

## Soap Service Configuration

service.endpoint=http://localhost:9999/service/hello-world
service.soap.action=https://aggarwalarpit.wordpress.com/hello-world/helloWorld
service.user.id=arpit
service.user.password=arpit
marshaller.packages.to.scan=com.arpit.soap.server.service
unmarshaller.packages.to.scan=com.arpit.soap.server.service

service.endpoint specified above is the URL provided to the service user to invoke the services exposed by the service provider.

service.soap.action specifies which process or program that need to be called when a request is sent by the service requester and also defines the relative path of the process/program.

marshaller.packages.to.scan specifies the packages to scan at time of marshalling before sending the request to the server.

unmarshaller.packages.to.scan specifies the packages to scan at time of unmarshalling after receiving the request from the server.

Now, we will generate Java Objects from WSDL using wsimport and copy it to the soap-client project executing below command on the terminal:

wsimport -keep -verbose http://localhost:9999/service/hello-world?wsdl

Step 10: Move to soap-client directory and run command: mvn spring-boot:run. Once command finishes we will see “Hello World from Arpit” as response from hello-world soap service on console.

While running if you are getting error as – Unable to marshal type “com.arpit.soap.server.service.HelloWorld” as an element because it is missing an @XmlRootElement annotation then add @XmlRootElement(name = “helloWorld”, namespace = “http://service.server.soap.arpit.com/ “) to the com.arpit.soap.server.service.HelloWorld, where namespace should be matched from xmlns:ser defined in soap envelope, as below:

<soapenv:Envelope xmlns:soapenv="http://schemas.xmlsoap.org/soap/envelope/" xmlns:ser="http://service.server.soap.arpit.com/">
<soapenv:Header>
<ser:arg1>
<userId>arpit</userId>
<password>arpit</password>
</ser:arg1>
</soapenv:Header>
<soapenv:Body>
<ser:helloWorld>
<!--Optional:-->
<arg0>Arpit</arg0>
</ser:helloWorld>
</soapenv:Body>
</soapenv:Envelope>

The complete source code is hosted on github.

Enterprise Integration Pattern with Spring

Recently in one of my project I got a requirement to poll a directory and it’s sub directories on a constant rate and process the files residing in it to drive some business information out of it. To implement the same we used enterprise integration pattern implementation of spring because of two reasons, firstly – we are already using spring as our backend framework and secondly – it enforce separation of concerns between business logic and integration logic in an intuitive way with well-defined boundaries to promote reusability and portability.

What is Spring Integration?

Spring Integration is an enterprise integration pattern implementation of spring which supports integration with external systems via declarative adapters and these adapters provide a higher-level of abstraction over Spring’s support for remoting, messaging, and scheduling. It does not need a container or separate process space and can be invoked in existing program as it is just a JAR which can be dropped with WAR or standalone systems. You can read the full blog at  http://blog.xebia.in/2016/03/28/enterprise-integration-pattern-with-spring/

Deploying Web Application on EC2 Instance- AWS

In this post, we will deploy spring web application on EC2 Amazon Linux AMI t2.micro instance following below steps:

Step 1: Set up Amazon EC2 instance following set-up-amazon-ec2-instance.

Step 2: Launch an EC2 instance following ec2-launch-linux-instance.

Step 3: Upload .war file from local machine directory to EC2 user home (/home/ec2-user) directory using secure copy as follows:

scp -i /Users/ArpitAggarwal/arpitaggarwal-key-pair.pem /Users/ArpitAggarwal/hello-spring/target/hello-spring.war ec2-user@ec2-54-218-30-7.us-west-2.compute.amazonaws.com:/home/ec2-user

arpitaggarwal-key-pair.pem refers to private key file.
ec2-user@ec2-54-218-30-7.us-west-2.compute.amazonaws.com refers to public dns name of EC2 instance.

Step 4: Connect to your EC2 instance using your private key file and public dns name as follows:

ssh -i /Users/ArpitAggarwal/arpitaggarwal-key-pair.pem ec2-user@ec2-54-218-30-7.us-west-2.compute.amazonaws.com

Step 5: Install Tomcat7 on EC2 instance as a root user:

[ec2-user@ip-10-0-0-28 ~]$ sudo su root
[ec2-user@ip-10-0-0-28 ~]$ yum install tomcat7

Step 6: Copy .war file from ec2-user home directory to webapps folder of tomcat, as follows:

[root@ip-10-0-0-28 ec2-user]# cp hello-spring.war /usr/share/tomcat7/webapps/

Step 7: Edit the JAVA_HOME in /etc/tomcat7/tomcat7.conf to point to JDK 7, replacing

# Where your java installation lives
JAVA_HOME="/usr/lib/jvm/jre"

to

# Where your java installation lives
JAVA_HOME="/usr/lib/jvm/java-1.7.0-openjdk-1.7.0.91.x86_64"

Step 8: Start tomcat as follows:

[root@ip-10-0-0-28 ec2-user]# start tomcat7

Step 9: As tomcat is running on port 8080, we have to allow 8080 port from security group. To do that, from your instance, find out the security group associated and edit the security group adding another Type as Custom TCP Rule, Protocol as TCP, Port Range as 8080 and Source as Anywhere.

Now, access the web application from your browser using public dns name of your ec2 instance as:
http://ec2-54-218-30-7.us-west-2.compute.amazonaws.com:8080/hello-spring/

The complete source code of spring web application is hosted on github.

Migrating React Native App to AndroidX

In this post, we will learn to migrate React Native application to AndoridX. Before starting, let me give you a brief introduction about Jetpack.

What is Android Jetpack?

Android Jetpack is the next generation of Android components, bringing together the benefits of the Support Library – backwards compatibility and immediate updates to a larger set of components, making it quick and easy to build robust, high quality apps. Android Jetpack manages activities like background tasks, navigation, and lifecycle management, so you can eliminate boilerplate code and focus on what makes your app great.

To start with the migration, firstly, edit gradle.properties of React Native application to add the following lines:

android.useAndroidX=true
android.enableJetifier=true

Next, Install jetifier package executing following command:

$ npm install --save-dev jetifier

Call npx jetify to migrate all node_modules to AndroidX, as follows:

$ npx jetify

And finally run your application using npx:

npx react-native run-android