Microservices fault and latency tolerance using Netflix Hystrix

Recently in one of my project I got a requirement to execute a fallback call for a failing webservice call. To implement the same I was looking for some implementation of circuit breaker pattern and finally came across Netflix Hystrix library which I found is the best suited library as per our application.

In this post I tried to showcase a thin example of our problem and how Hystrix solved the same using a single microservice and a client to access it along with Hystrix Dashboard. Before diving into coding, let’s understand in brief what Hystrix is and how it works internally.

What is Hystrix?

Hystrix is a library that helps us control the interactions between the distributed services by adding latency tolerance and fault tolerance logic. It does this by isolating points of access between the services, stopping cascading failures across them, and providing fallback options, all of which improve our system’s overall resiliency.

It implements the circuit breaker pattern which work on circuit-breaker transitions from CLOSED to OPEN when a circuit meets a specified threshold and error percentage exceeds the threshold error percentage. While it is open, it short-circuits all requests made against that circuit-breaker. After some amount of time, the next single request is let through (this is the HALF-OPEN state). If the request fails, the circuit-breaker returns to the OPEN state for the duration of the sleep window. If the request succeeds, the circuit-breaker transitions to CLOSED and all requests made against that circuit-breaker are passed through to the service. More you can explore here.

Now, let’s start creating employee-service microservice running on port 8090 and client to access the same along with Hystrix Dashboard following below steps:

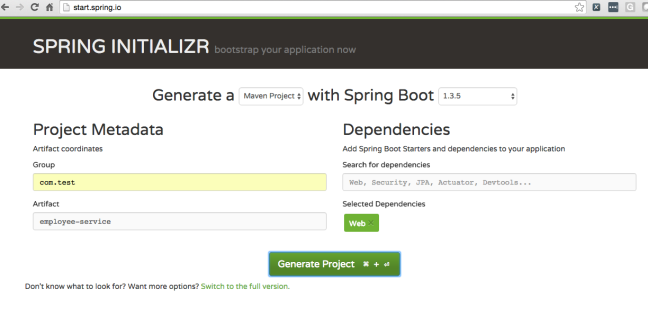
Step 1: Go to start.spring.io and create a new project employee-service adding the Web starters, based on the following image:

screen-1

Step 2: Edit EmployeeServiceApplication.java to add a method which returns a list of employee, as follows:

import org.springframework.boot.SpringApplication;
import org.springframework.boot.autoconfigure.SpringBootApplication;
import org.springframework.web.bind.annotation.RequestMapping;
import org.springframework.web.bind.annotation.RestController;

@SpringBootApplication
@RestController
public class EmployeeServiceApplication {

public static void main(String[] args) {
SpringApplication.run(EmployeeServiceApplication.class, args);
}

@RequestMapping(value = "/list")
public String list() {
return "Arpit, Sanjeev, Abhishek";
}
}

Step 3: Edit application.properties to specify the application name and port number of a service, as follows:

server.port=8090
spring.application.name=employee-service

Step 4: Move to employee-service directory and run command: mvn spring-boot:run. Once running, open http://localhost:8090/list.

Next, we will create hystrix-client which will access our newly created employee-service and if it is down will return the response from fallback method.

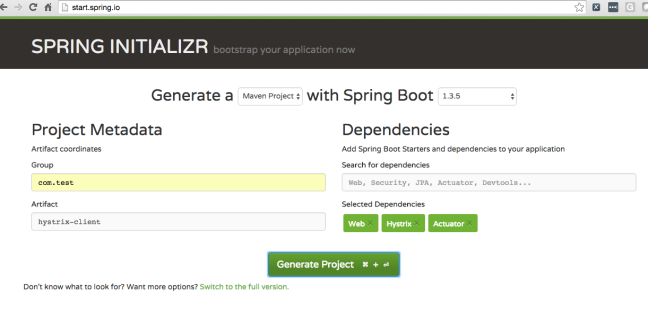
Step 5: Go to start.spring.io and create a new project hystrix-client adding the Web, Hystrix and Actuator starters, based on the following image:

screen-2

Step 6: Edit HystrixClientApplication.java to add a method which calls employee-service to get a response and if service is down or unavailable because of any reason return a response from fallback method, as follows:

import org.springframework.beans.factory.annotation.Autowired;
import org.springframework.boot.SpringApplication;
import org.springframework.boot.autoconfigure.SpringBootApplication;
import org.springframework.cloud.client.circuitbreaker.EnableCircuitBreaker;
import org.springframework.cloud.netflix.hystrix.EnableHystrix;
import org.springframework.context.annotation.Bean;
import org.springframework.context.annotation.ComponentScan;
import org.springframework.context.support.PropertySourcesPlaceholderConfigurer;
import org.springframework.web.bind.annotation.RequestMapping;
import org.springframework.web.bind.annotation.RestController;
import org.springframework.web.servlet.config.annotation.WebMvcConfigurerAdapter;

import com.test.service.IEmployeeService;

@EnableHystrix
@EnableCircuitBreaker
@SpringBootApplication
@RestController
@ComponentScan(basePackages = { "com.test.service" })
public class HystrixClientApplication {

@Autowired
private IEmployeeService employeeService;

public static void main(String[] args) {
SpringApplication.run(HystrixClientApplication.class, args);
}

@RequestMapping("/list")
public String list() {
return employeeService.list();
}

static class ApplicationConfig extends WebMvcConfigurerAdapter {

@Bean
public static PropertySourcesPlaceholderConfigurer propertySourcesPlaceholderConfigurer() {
return new PropertySourcesPlaceholderConfigurer();
}
}
}

Step 7: Create interface IEmployeeService and it’s implementation class EmployeeServiceImpl under com.test.service package and edit them as follows:

IEmployeeService.java

package com.test.service;

public interface IEmployeeService {
String list();
}

EmployeeServiceImpl.java

package com.test.service.impl;

import java.net.URI;

import org.springframework.beans.factory.annotation.Value;
import org.springframework.stereotype.Service;
import org.springframework.web.client.RestTemplate;

import com.netflix.hystrix.contrib.javanica.annotation.HystrixCommand;
import com.netflix.hystrix.contrib.javanica.annotation.HystrixProperty;
import com.test.service.IEmployeeService;

@Service
public class EmployeeServiceImpl implements IEmployeeService {

@Value("#{'${employee.service.url}'}")
private String employeeServiceUrl;

@HystrixCommand(commandProperties = {
@HystrixProperty(name = "execution.isolation.strategy", value = "THREAD"),
@HystrixProperty(name = "execution.timeout.enabled", value = "true"),
@HystrixProperty(name = "execution.isolation.thread.timeoutInMilliseconds", value = "500"),
@HystrixProperty(name = "execution.isolation.thread.interruptOnTimeout", value = "true"),
@HystrixProperty(name = "fallback.enabled", value = "true"),
@HystrixProperty(name = "circuitBreaker.enabled", value = "true"),
@HystrixProperty(name = "circuitBreaker.requestVolumeThreshold", value = "10"),
@HystrixProperty(name = "circuitBreaker.sleepWindowInMilliseconds", value = "1000"),
@HystrixProperty(name = "circuitBreaker.errorThresholdPercentage", value = "10"),
@HystrixProperty(name = "circuitBreaker.forceOpen", value = "false"),
@HystrixProperty(name = "circuitBreaker.forceClosed", value = "false") }, fallbackMethod = "fallback", commandKey = "list", groupKey = "EmployeeServiceImpl", threadPoolKey = "thread-pool-employee-service", threadPoolProperties = { @HystrixProperty(name = "coreSize", value = "5") }, ignoreExceptions = { IllegalAccessException.class })
public String list() {
RestTemplate restTemplate = new RestTemplate();
URI uri = URI.create(employeeServiceUrl + "/list");
return restTemplate.getForObject(uri, String.class);
}

public String fallback() {
return "Fallback call, seems employee service is down";
}
}

@HystrixCommand specified above is used to wrap code that will execute potentially risky functionality with fault and latency tolerance, statistics and performance metrics capture, circuit breaker and bulkhead functionality.

@HystrixProperty specified above is used to control HystrixCommand behavior. All available options are listed here.

Step 8: Edit application.properties to specify the application port on which hystrix-client should be running and url on which employee-service is available, as follows:

server.port=8080
employee.service.url=http://localhost:8090

Step 9: Move to hystrix-client directory and run command: mvn spring-boot:run. Once running, open http://localhost:8080/list.

Is Hystrix working?

Shut down the employee-service application. Fallback message should be seen : Fallback call, seems employee service is down.

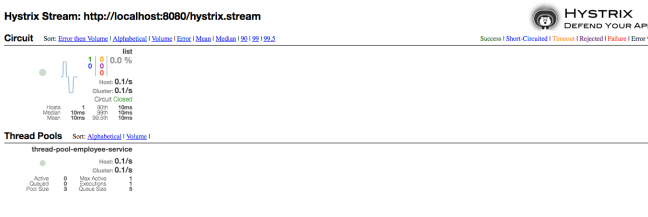
Next, we will create Hystrix Dashboard which will provide us the graphical view of success and failure requests, circuit status, host, cluster and thread pool status of an application.

Step 10: Go to start.spring.io and create a new project hystrix-dashboard adding the Hystrix Dashboard starters. Once created edit HystrixDashboardApplication.java, as follows:

import org.springframework.boot.SpringApplication;
import org.springframework.boot.autoconfigure.SpringBootApplication;
import org.springframework.cloud.netflix.hystrix.dashboard.EnableHystrixDashboard;

@SpringBootApplication
@EnableHystrixDashboard
public class HystrixDashboardApplication {

public static void main(String[] args) {
SpringApplication.run(HystrixDashboardApplication.class, args);
}
}

Step 11: Edit application.properties to specify the application port on which hystrix-dashboard should be running, as follows:

server.port=8383

Step 12: Move to hystrix-dashboard directory and run command: mvn spring-boot:run. Once running, open http://localhost:8383/hystrix and enter http://localhost:8080/hystrix.stream in stream textbox and click Monitor Stream. Once dashboard is loaded we will see image similar to below:

screen-3

The complete source code is hosted on github.

Writing and Consuming SOAP Webservice with Spring

In the era of RESTful Web Services, I got a chance to consume SOAP Web Service. To do the same I chosen Spring, reason being we are already using Spring as backend framework in our project and secondly it provides an intuitive way to interact service(s) with well-defined boundaries to promote reusability and portability through WebServiceTemplate.

Assuming you already know about SOAP Web Services, let’s start creating hello-world soap service running on port 9999 and client to consume the same, following below steps:

Step 1: Go to start.spring.io and create a new project soap-server adding the Web starters, based on the following image:

soap-server

Step 2: Edit SoapServerApplication.java to publish the hello-world service at Endpoint – http://localhost:9999/service/hello-world, as follows:


package com.arpit.soap.server.main;

import javax.xml.ws.Endpoint;

import org.springframework.beans.factory.annotation.Value;
import org.springframework.boot.CommandLineRunner;
import org.springframework.boot.SpringApplication;
import org.springframework.boot.autoconfigure.SpringBootApplication;

import com.arpit.soap.server.service.impl.HelloWorldServiceImpl;

@SpringBootApplication
public class SoapServerApplication implements CommandLineRunner {

@Value("${service.port}")
private String servicePort;

@Override
public void run(String... args) throws Exception {
Endpoint.publish("http://localhost:" + servicePort
+ "/service/hello-world", new HelloWorldServiceImpl());
}

public static void main(String[] args) {
SpringApplication.run(SoapServerApplication.class, args);
}
}

Step 3: Edit application.properties to specify the application name, port and port number of hello-world service, as follows:

server.port=9000
spring.application.name=soap-server

## Soap Service Port
service.port=9999

Step 4: Create additional packages as com.arpit.soap.server.service and com.arpit.soap.server.service.impl to define the Web Service and it’s implementation, as follows:

HelloWorldService.java

package com.arpit.soap.server.service;

import javax.jws.WebMethod;
import javax.jws.WebParam;
import javax.jws.WebService;

import com.arpit.soap.server.model.ApplicationCredentials;

@WebService
public interface HelloWorldService {

@WebMethod(operationName = "helloWorld", action = "https://aggarwalarpit.wordpress.com/hello-world/helloWorld")
String helloWorld(final String name,
@WebParam(header = true) final ApplicationCredentials credential);

}

@WebService specified above marks a Java class as implementing a Web Service, or a Java interface as defining a Web Service interface.

@WebMethod specified above marks a Java method as a Web Service operation.

@WebParam specified above customize the mapping of an individual parameter to a Web Service message part and XML element.

HelloWorldServiceImpl.java

package com.arpit.soap.server.service.impl;

import javax.jws.WebService;

import com.arpit.soap.server.model.ApplicationCredentials;
import com.arpit.soap.server.service.HelloWorldService;

@WebService(endpointInterface = "com.arpit.soap.server.service.HelloWorldService")
public class HelloWorldServiceImpl implements HelloWorldService {

@Override
public String helloWorld(final String name,
final ApplicationCredentials credential) {
return "Hello World from " + name;
}
}

Step 5: Move to soap-server directory and run command: mvn spring-boot:run. Once running, open http://localhost:9999/service/hello-world?wsdl to view the WSDL for the hello-world service.

Next, we will create soap-client which will consume our newly created hello-world service.

Step 6: Go to start.spring.io and create a new project soap-client adding the Web, Web Services starters, based on the following image:

soap-client.png

Step 7: Edit SoapClientApplication.java to create a request to hello-world web service, sending the same to soap-server along with header and get the response from it, as follows:


package com.arpit.soap.client.main;

import java.io.IOException;
import java.io.StringWriter;

import javax.xml.bind.JAXBElement;
import javax.xml.transform.Transformer;
import javax.xml.transform.TransformerException;
import javax.xml.transform.TransformerFactory;
import javax.xml.transform.stream.StreamResult;

import org.springframework.beans.factory.annotation.Autowired;
import org.springframework.beans.factory.annotation.Qualifier;
import org.springframework.beans.factory.annotation.Value;
import org.springframework.boot.CommandLineRunner;
import org.springframework.boot.SpringApplication;
import org.springframework.boot.autoconfigure.SpringBootApplication;
import org.springframework.context.annotation.ComponentScan;
import org.springframework.ws.WebServiceMessage;
import org.springframework.ws.client.core.WebServiceMessageCallback;
import org.springframework.ws.client.core.WebServiceTemplate;
import org.springframework.ws.soap.SoapMessage;
import org.springframework.xml.transform.StringSource;

import com.arpit.soap.server.service.ApplicationCredentials;
import com.arpit.soap.server.service.HelloWorld;
import com.arpit.soap.server.service.HelloWorldResponse;
import com.arpit.soap.server.service.ObjectFactory;

@SpringBootApplication
@ComponentScan("com.arpit.soap.client.config")
public class SoapClientApplication implements CommandLineRunner {

@Autowired
@Qualifier("webServiceTemplate")
private WebServiceTemplate webServiceTemplate;

@Value("#{'${service.soap.action}'}")
private String serviceSoapAction;

@Value("#{'${service.user.id}'}")
private String serviceUserId;

@Value("#{'${service.user.password}'}")
private String serviceUserPassword;

public static void main(String[] args) {
SpringApplication.run(SoapClientApplication.class, args);
System.exit(0);
}

public void run(String... args) throws Exception {
final HelloWorld helloWorld = createHelloWorldRequest();
@SuppressWarnings("unchecked")
final JAXBElement<HelloWorldResponse> jaxbElement = (JAXBElement<HelloWorldResponse>) sendAndRecieve(helloWorld);
final HelloWorldResponse helloWorldResponse = jaxbElement.getValue();
System.out.println(helloWorldResponse.getReturn());
}

private Object sendAndRecieve(HelloWorld seatMapRequestType) {
return webServiceTemplate.marshalSendAndReceive(seatMapRequestType,
new WebServiceMessageCallback() {
public void doWithMessage(WebServiceMessage message)
throws IOException, TransformerException {
SoapMessage soapMessage = (SoapMessage) message;
soapMessage.setSoapAction(serviceSoapAction);
org.springframework.ws.soap.SoapHeader soapheader = soapMessage
.getSoapHeader();
final StringWriter out = new StringWriter();
webServiceTemplate.getMarshaller().marshal(
getHeader(serviceUserId, serviceUserPassword),
new StreamResult(out));
Transformer transformer = TransformerFactory
.newInstance().newTransformer();
transformer.transform(new StringSource(out.toString()),
soapheader.getResult());
}
});
}

private Object getHeader(final String userId, final String password) {
final https.aggarwalarpit_wordpress.ObjectFactory headerObjectFactory = new https.aggarwalarpit_wordpress.ObjectFactory();
final ApplicationCredentials applicationCredentials = new ApplicationCredentials();
applicationCredentials.setUserId(userId);
applicationCredentials.setPassword(password);
final JAXBElement<ApplicationCredentials> header = headerObjectFactory
.createApplicationCredentials(applicationCredentials);
return header;
}

private HelloWorld createHelloWorldRequest() {
final ObjectFactory objectFactory = new ObjectFactory();
final HelloWorld helloWorld = objectFactory.createHelloWorld();
helloWorld.setArg0("Arpit");
return helloWorld;
}

}

Step 8: Next, create additional package com.arpit.soap.client.config to configure WebServiceTemplate, as follows:

ApplicationConfig.java

package com.arpit.soap.client.config;

import org.springframework.beans.factory.annotation.Value;
import org.springframework.context.annotation.Bean;
import org.springframework.context.annotation.Configuration;
import org.springframework.context.support.PropertySourcesPlaceholderConfigurer;
import org.springframework.oxm.jaxb.Jaxb2Marshaller;
import org.springframework.web.servlet.config.annotation.EnableWebMvc;
import org.springframework.web.servlet.config.annotation.WebMvcConfigurerAdapter;
import org.springframework.ws.client.core.WebServiceTemplate;
import org.springframework.ws.soap.saaj.SaajSoapMessageFactory;
import org.springframework.ws.transport.http.HttpComponentsMessageSender;

@Configuration
@EnableWebMvc
public class ApplicationConfig extends WebMvcConfigurerAdapter {

@Value("#{'${service.endpoint}'}")
private String serviceEndpoint;

@Value("#{'${marshaller.packages.to.scan}'}")
private String marshallerPackagesToScan;

@Value("#{'${unmarshaller.packages.to.scan}'}")
private String unmarshallerPackagesToScan;

@Bean
public static PropertySourcesPlaceholderConfigurer propertySourcesPlaceholderConfigurer() {
return new PropertySourcesPlaceholderConfigurer();
}

@Bean
public SaajSoapMessageFactory messageFactory() {
SaajSoapMessageFactory messageFactory = new SaajSoapMessageFactory();
messageFactory.afterPropertiesSet();
return messageFactory;
}

@Bean
public Jaxb2Marshaller marshaller() {
Jaxb2Marshaller marshaller = new Jaxb2Marshaller();
marshaller.setPackagesToScan(marshallerPackagesToScan.split(","));
return marshaller;
}

@Bean
public Jaxb2Marshaller unmarshaller() {
Jaxb2Marshaller unmarshaller = new Jaxb2Marshaller();
unmarshaller.setPackagesToScan(unmarshallerPackagesToScan.split(","));
return unmarshaller;
}

@Bean
public WebServiceTemplate webServiceTemplate() {
WebServiceTemplate webServiceTemplate = new WebServiceTemplate(
messageFactory());
webServiceTemplate.setMarshaller(marshaller());
webServiceTemplate.setUnmarshaller(unmarshaller());
webServiceTemplate.setMessageSender(messageSender());
webServiceTemplate.setDefaultUri(serviceEndpoint);
return webServiceTemplate;
}

@Bean
public HttpComponentsMessageSender messageSender() {
HttpComponentsMessageSender httpComponentsMessageSender = new HttpComponentsMessageSender();
return httpComponentsMessageSender;
}
}

Step 9: Edit application.properties to specify the application name, port and hello-world soap web service configurations, as follows:

server.port=9000
spring.application.name=soap-client

## Soap Service Configuration

service.endpoint=http://localhost:9999/service/hello-world
service.soap.action=https://aggarwalarpit.wordpress.com/hello-world/helloWorld
service.user.id=arpit
service.user.password=arpit
marshaller.packages.to.scan=com.arpit.soap.server.service
unmarshaller.packages.to.scan=com.arpit.soap.server.service

service.endpoint specified above is the URL provided to the service user to invoke the services exposed by the service provider.

service.soap.action specifies which process or program that need to be called when a request is sent by the service requester and also defines the relative path of the process/program.

marshaller.packages.to.scan specifies the packages to scan at time of marshalling before sending the request to the server.

unmarshaller.packages.to.scan specifies the packages to scan at time of unmarshalling after receiving the request from the server.

Now, we will generate Java Objects from WSDL using wsimport and copy it to the soap-client project executing below command on the terminal:

wsimport -keep -verbose http://localhost:9999/service/hello-world?wsdl

Step 10: Move to soap-client directory and run command: mvn spring-boot:run. Once command finishes we will see “Hello World from Arpit” as response from hello-world soap service on console.

While running if you are getting error as – Unable to marshal type “com.arpit.soap.server.service.HelloWorld” as an element because it is missing an @XmlRootElement annotation then add @XmlRootElement(name = “helloWorld”, namespace = “http://service.server.soap.arpit.com/ “) to the com.arpit.soap.server.service.HelloWorld, where namespace should be matched from xmlns:ser defined in soap envelope, as below:

<soapenv:Envelope xmlns:soapenv="http://schemas.xmlsoap.org/soap/envelope/" xmlns:ser="http://service.server.soap.arpit.com/">
<soapenv:Header>
<ser:arg1>
<userId>arpit</userId>
<password>arpit</password>
</ser:arg1>
</soapenv:Header>
<soapenv:Body>
<ser:helloWorld>
<!--Optional:-->
<arg0>Arpit</arg0>
</ser:helloWorld>
</soapenv:Body>
</soapenv:Envelope>

The complete source code is hosted on github.

Enterprise Integration Pattern with Spring

Recently in one of my project I got a requirement to poll a directory and it’s sub directories on a constant rate and process the files residing in it to drive some business information out of it. To implement the same we used enterprise integration pattern implementation of spring because of two reasons, firstly – we are already using spring as our backend framework and secondly – it enforce separation of concerns between business logic and integration logic in an intuitive way with well-defined boundaries to promote reusability and portability.

What is Spring Integration?

Spring Integration is an enterprise integration pattern implementation of spring which supports integration with external systems via declarative adapters and these adapters provide a higher-level of abstraction over Spring’s support for remoting, messaging, and scheduling. It does not need a container or separate process space and can be invoked in existing program as it is just a JAR which can be dropped with WAR or standalone systems. You can read the full blog at  http://blog.xebia.in/2016/03/28/enterprise-integration-pattern-with-spring/

Deploying Web Application on EC2 Instance- AWS

In this post, we will deploy spring web application on EC2 Amazon Linux AMI t2.micro instance following below steps:

Step 1: Set up Amazon EC2 instance following set-up-amazon-ec2-instance.

Step 2: Launch an EC2 instance following ec2-launch-linux-instance.

Step 3: Upload .war file from local machine directory to EC2 user home (/home/ec2-user) directory using secure copy as follows:

scp -i /Users/ArpitAggarwal/arpitaggarwal-key-pair.pem /Users/ArpitAggarwal/hello-spring/target/hello-spring.war ec2-user@ec2-54-218-30-7.us-west-2.compute.amazonaws.com:/home/ec2-user

arpitaggarwal-key-pair.pem refers to private key file.
ec2-user@ec2-54-218-30-7.us-west-2.compute.amazonaws.com refers to public dns name of EC2 instance.

Step 4: Connect to your EC2 instance using your private key file and public dns name as follows:

ssh -i /Users/ArpitAggarwal/arpitaggarwal-key-pair.pem ec2-user@ec2-54-218-30-7.us-west-2.compute.amazonaws.com

Step 5: Install Tomcat7 on EC2 instance as a root user:

[ec2-user@ip-10-0-0-28 ~]$ sudo su root
[ec2-user@ip-10-0-0-28 ~]$ yum install tomcat7

Step 6: Copy .war file from ec2-user home directory to webapps folder of tomcat, as follows:

[root@ip-10-0-0-28 ec2-user]# cp hello-spring.war /usr/share/tomcat7/webapps/

Step 7: Edit the JAVA_HOME in /etc/tomcat7/tomcat7.conf to point to JDK 7, replacing

# Where your java installation lives
JAVA_HOME="/usr/lib/jvm/jre"

to

# Where your java installation lives
JAVA_HOME="/usr/lib/jvm/java-1.7.0-openjdk-1.7.0.91.x86_64"

Step 8: Start tomcat as follows:

[root@ip-10-0-0-28 ec2-user]# start tomcat7

Step 9: As tomcat is running on port 8080, we have to allow 8080 port from security group. To do that, from your instance, find out the security group associated and edit the security group adding another Type as Custom TCP Rule, Protocol as TCP, Port Range as 8080 and Source as Anywhere.

Now, access the web application from your browser using public dns name of your ec2 instance as:
http://ec2-54-218-30-7.us-west-2.compute.amazonaws.com:8080/hello-spring/

The complete source code of spring web application is hosted on github.

Fixing com.couchbase.client.java.error.TranscodingException: Could not encode document with ID cache:EMPLOYEE_:1 – Couchbase

If you are using couchbase spring cache then you might get following exception:


Error occured: Details com.couchbase.client.java.error.TranscodingException: Could not encode document with ID cache:EMPLOYEE_:1

This exception is raised by couchbase client when document is not able to serialized, possible use case is when you are caching the resource which contain nested objects and does not implement Serializable, for example:

Employee.java


public class Employee {

   private int id;
   private String name;
   private Address address;
}

Address.java


 public class Address {
   private String city;
   private String country;
}

If you are facing the same problem as me then you can fix it implementing Serializable in all the classes, as follows:

Employee.java

import java.io.Serializable;

public class Employee implements Serializable {

  private static final long serialVersionUID = 1L;
  private int id;
  private String name;
  private Address address;
}

Address.java

import java.io.Serializable;

public class Address implements Serializable {

  private static final long serialVersionUID = 1L;
  private String city;
  private String country;

}

Fixing com.couchbase.client.java.error.DocumentDoesNotExistException – Couchbase

If you are using couchbase spring cache then you might get following exception:


12:16:58,338 ERROR [com.arpit.common.util.Resource] (http-/127.0.0.1:8080-6) Error occured: Details com.couchbase.client.java.error.DocumentDoesNotExistException

This exception is raised by couchbase client when document does not exist in cache and a replace operation is used, possible use case is when you are caching the resource which return null (which was happening for me), for example:

@Override
@Cacheable(value = "EMPLOYEE_", key = "#id")
public Employee getEmployee(int id) {
	return null;
}

If you are facing the same problem as me then you can fix it using the unless attribute of @Cacheable which is available as of Spring 3.2, as follows:

@Override
@Cacheable(value = "EMPLOYEE_", key = "#id", unless = "#result == null")
public Employee getEmployee(int id) {
	return null;
}

Setting TTL for @Cacheable – Spring

Today I was asked to set the expiry time of cache for some of the keys our application is using, so I quickly started looking for all of the options provided by Spring @Cacheable notation to set up the expiry time or time to live. Since Spring does not provide any configurable option to achieve it, I build one implementation leveraging @Scheduled annotation with a fixed delay, as follows:


@CacheEvict(allEntries = true, cacheNames = { "EMPLOYEE_", "MANAGER_" })
@Scheduled(fixedDelay = 30000)
public void cacheEvict() {
}

Now the problem is I want cache names as well as the fixed delay time period should be populated from environmental values instead of hard coded values. To achieve the same I declared variables(populated from properties file) at class level and populated the values of the key in the annotation which made IDE to complain that values must be constant, as follows:

“The value for annotation attribute CacheEvict.cacheNames must be a constant expression”

Then I started looking for other options to get the values for the keys from environment and came across fixedDelayString element of @Scheduled notation which helped me to achieve my goal, as follows:


@Scheduled(fixedDelayString = "${couchbase.cache.flush.fixed.delay}")
public void cacheEvict() {
}

Looking for the similar element for @CacheEvict annotation as well, which is unfortunately not available given me a hint after reading the the comment on a bug SPR-10778 which says:

“The cache abstraction supports the CacheResolver abstraction now and it can be specified globally, per class and/or on a specific operation. The CacheResolver give you the ability to compute the caches to use in code so you have all the flexibility that you want.”

As bug says to make use of CacheResolver to dynamically populate the cache names, I used AbstractCacheResolver implementation of it to get the names of cache from environment, as follows:


@Value("#{'${couchbase.cache.flush}'}")
private String couchbaseCacheFlush;

@Bean(name = "customCacheResolver")
	public CacheResolver cacheResolver() {
		CacheResolver cacheResolver = new AbstractCacheResolver(cacheManager()) {
			@Override
			protected Collection<String> getCacheNames(
					CacheOperationInvocationContext<?> context) {
				return Arrays.asList(couchbaseCacheFlush.split(","));
			}
		};
		return cacheResolver;
	}

Modifying the cacheEvict() to use custom cache resolver instead of cache names completed my task for the day, as follows:


@CacheEvict(allEntries = true, cacheResolver = "customCacheResolver")
@Scheduled(fixedDelayString = "${couchbase.cache.flush.fixed.delay}")
public void cacheEvict() {
}

Complete source is available on github.

Deploying RESTful Service on Cloudfoundry

In this post, we will deploy RESTful service on Cloudfoundry using Pivotal Cloud Foundry (PCF) Dev. As creating a restful web service is not a part of this post, I already created employee-service which have a static backend and available for clone from GitHub.

Before deploying it on Cloudfoundry, let’s have a brief about it.

Cloudfoundry

Cloud Foundry is an open source cloud platform as a service (PaaS) on which developers can build, deploy, run and scale applications on public and private cloud models. It is VMware originally created by VMware and now it is part of Pivotal Software.

Now let’s set up lightweight PCF on our local workstation using PCF Dev, following below steps:

Step 1: Download and install cf-cli-installer_6.22.2_osx.pkg  in a directory, for me it’s /Users/ArpitAggarwal/cloudfoundry

$ cd /Users/ArpitAggarwal/cloudfoundry/ 
$ sudo installer -pkg ./cf-cli-installer_6.22.2_osx.pkg -target /

Step 2: Test if Cloudfoundry CLI installed successfully:

$ cf help

Step 3: Next we will download and install PCF Dev in the same directory we created earlier, as follows:

$ cd /Users/ArpitAggarwal/cloudfoundry/
$ unzip pcfdev-v0.22.0+PCF1.8.2-osx.zip
$ ./pcfdev-v0.22.0+PCF1.8.2-osx

Start 4: Start PCF Dev:

$ cd /Users/ArpitAggarwal/cloudfoundry/
$ cf dev start

Above command starts a single virtual machine on our workstation running PCF.

Step 5: Clone employee-service from GitHub in a directory, for me it’s /Users/ArpitAggarwal/

$ cd /Users/ArpitAggarwal/
$ git clone https://github.com/arpitaggarwal/empoyee-service.git

Step 6: Update the employee-service with manifest.yml:

$ cd /Users/ArpitAggarwal/employee-service
$ touch manifest.yml

manifest.yml created above is used by PCF for deployment to local workstation or on public cloud.

Step 7: Copy the below content in manifest.yml:

---
applications:
- name: empoyee-service
  memory: 1G
  random-route: true
  path: build/libs/empoyee-service-0.0.1.war
  buildpack: https://github.com/arpitaggarwal/java-buildpack.git

name attribute specified above is the name of an application.
path attribute is the directory location of an application.
buildpack attribute points to the java-buildpack, which is used by PCF for running JVM-based applications.

More about manifest.yml you can explore here.

Step 8: Next, we will build the application and push it to Cloudfoundry local workstation after login, as follows:

$ cd /Users/ArpitAggarwal/empoyee-service
$ empoyee-service git:(master) ./gradlew clean build
$ empoyee-service git:(master) ✗ cf login -a api.local.pcfdev.io --skip-ssl-validation
API endpoint: api.local.pcfdev.io

Email> user
Password> pass

$ cf push

cf push command specified above push an app or syncs changes to an existing app to the URL http://empoyee-service.local.pcfdev.io

Is application successfully deployed on Cloudfoundry?

Let’s verify it viewing the recent deployment logs where we can look server start up status, as follows:

$ cd /Users/ArpitAggarwal/empoyee-service
$ cf logs empoyee-service --recent

We can also verify application deployment executing GET and POST request against it, as follows:

GET Request to get all employees:

curl -i -H "Accept: application/json" -H "Content-Type: application/json" http://empoyee-service.local.pcfdev.io/empoyee/get

POST Request to create an employee:

curl -H "Content-Type: application/json" -X POST -d '{"name": "Arpit Aggarwal","email":"aggarwalarpit.89@gmail.com"}' http://empoyee-service.local.pcfdev.io/employee/create

The complete source code is hosted on github.

Running Web Application in Linked Docker Containers Environment

In post Dockerizing Web Application with Puppet we hosted web application in a single container, this time we will host a web application in a linked docker container environment – one in which our database (mysql) resides leveraged by our web application hosted in another docker container.

Before start, let’s have a brief about Linking Docker containers and how it helps us.

Linking or connecting Docker containers?
Linking Docker containers allows containers to discover each other and securely transfer information between them. Linking set up a conduit between containers allowing recipient container securely access source container preventing exposing the source container to the network.

In this post, recipient container is the spring-application-container which we created in this post and source container is the database container which we create now.

Let’s start with creating database container and linking it with  spring-application-container, following below steps:

Step 1: Create directory with any name for me it’s database-container inside directory docker (created in this post), as follows:

$ cd docker
$ mkdir database-container
$ cd database-container
$ touch Dockerfile

Step 2: Copy the below content in docker/database-container/Dockerfile:

FROM ubuntu:latest
MAINTAINER arpitaggarwal "aggarwalarpit.89@gmail.com"
RUN apt-get install -q -y mysql-server
RUN apt-get install -q -y mysql-client
RUN sed -i -e"s/^bind-address\s*=\s*127.0.0.1/bind-address = 0.0.0.0/" /etc/mysql/my.cnf
EXPOSE 3306

RUN sed -i -e”s/^bind-address\s*=\s*127.0.0.1/bind-address = 0.0.0.0/” /etc/mysql/my.cnf specified above is to set the MYSQL bind-address to 0.0.0.0 because it usually only listens on 127.0.0.1 by default.

Step 3: Build the newly created database-container as follows:

$ cd database-container
$ docker build --no-cache=true -t database .

database specified above refers to name of a database-container image.

Step 4: Start database-container assigning a name “db” and MYSQL Server installed as a service inside database-container, as follows:

$ docker run -P -it --name db database /bin/bash

Step 5: Modify the existing spring-application-container Dockerfile to copy the new application to the container which is using database hosted on database-container, as follows:

FROM ubuntu:latest
MAINTAINER arpitaggarwal "aggarwalarpit.89@gmail.com"
RUN apt-get -y update
RUN apt-get -q -y install git
RUN sudo apt-get install -y ruby
RUN apt-get install -y ruby-dev
RUN apt-get -y update
RUN apt-get install -y make
RUN apt-get install -y build-essential
RUN apt-get install -y puppet
RUN gem install librarian-puppet
ADD Puppetfile /
RUN librarian-puppet install
RUN puppet apply --modulepath=/modules -e "include java8 class { 'tomcat':version => '7',java_home => '/usr/lib/jvm/java-8-oracle'}"
RUN apt-get remove -y make puppet build-essential ruby-dev
COPY /spring-mysql/target/spring-mysql.war /var/lib/tomcat7/webapps/
EXPOSE 8080

Step 6: Build the the application inside a docker directory, this time spring-mysql cloned from github:


$ cd docker
$ git clone https://github.com/arpitaggarwal/spring-mysql.git
$ cd spring-mysql
$ mvn clean install

Step 7: Next, start spring-application-container linking it with database-container as follows:

$ docker run -p 8080:8080 -it --name webapp --link db spring-application-container /bin/bash

–link flag specified above create a secure link between spring-application-container with the database-container and exposes connectivity information for the source container to the recipient container in two ways:

a). Environment variables.
b). Updating the /etc/hosts file.

Now we can use exposed environment variables or the entries from host to access the db container. Also, If we restart the source container, the linked containers /etc/hosts files will be automatically updated with the source container’s new IP address, allowing linked communication to continue.

In our application, we used the host entry mechanism to read the IP address of source container, using Java InetAddress.

Step 8: Our application will try to access the mysql database with user as “test” and password as “test” and use the employee table to store the employee details submitted from applicationso let’s create it:

$ mysql --user=root mysql
$ CREATE USER 'test'@'%' IDENTIFIED BY 'test’;
$ GRANT ALL PRIVILEGES ON *.* TO 'test'@'%' WITH GRANT OPTION;
$ FLUSH PRIVILEGES;
$ CREATE DATABASE  test;
$ USE TEST;
$ CREATE TABLE employee (id INT NOT NULL PRIMARY KEY AUTO_INCREMENT, name VARCHAR(20), age VARCHAR(30));

Step 9: Get your Docker container IP Address, using docker-machine:

docker-machine ip your_vm_name

Next, create employee submitting name and age from application and refresh the screen to retrieve it from database at url http://container-ip-address:8080/spring-mysql

The complete source code is hosted on github.


Dockerizing Web Application with Puppet

In post Installing Puppet Modules – Librarian Puppet we provisioned a Vagrant VM to install the puppet module from  Puppet Forge using librarian-puppet, now in this post we will do the same thing except we provision Docker container instead of Vagrant VM and deploy a hello-spring application in provisioned container.

Before starting with application deployment in Docker container let’s understand brief about Docker and how it is different from Virtual Machine.

What is Docker?

Docker is a high level abstraction over linux containers which manages the life cycle of containers. Docker allows to package an application with all of its dependencies into a standardize unit for software development. And if that unit runs on your local, we can guarantee that it will run exactly the same way, anywhere from QA, to staging, to production environments.

Docker vs Virtual Machine

Virtualization technologies like VirtualBox, VMWare, KVM, etc. use full machine virtualization whereas Docker share certain portions of the host kernel and operating system instance offering lower overhead at the cost of less isolation. Also, Docker provides a virtual environment that has its own CPU, memory, block I/O, network, etc. space using Cgroups features in Linux kernel on LXC host compared to virtualization technologies which offer us complete new virtual machine.
Now, let’s start with our deployment in container, following below steps:

Step 1: Create a directory with any name for me it’s docker and file with name Dockerfile and  Puppetfile inside the directory as follows:


$ mkdir docker
$ cd docker
$ touch Dockerfile Puppetfile

Dockerfile created above contains all the commands a user could call on the command line to assemble an image.

Puppetfile created above is a Ruby-based DSL specifies where puppet modules should be installed and where to fetch the modules from.

Step 2: Copy the below content in Puppetfile:

# Puppetfile Configuration for librarian-puppet.
forge "http://forge.puppetlabs.com"
mod "puppet-java8", :git => "https://github.com/arpitaggarwal/puppet-java8.git"
mod "arpitaggarwal/tomcat"

Step 3: Copy the below content in Dockerfile

FROM ubuntu:latest
MAINTAINER arpitaggarwal "aggarwalarpit.89@gmail.com"
RUN apt-get -y update
RUN apt-get -q -y install git
RUN sudo apt-get install -y ruby
RUN apt-get install -y ruby-dev
RUN apt-get -y update
RUN apt-get install -y make
RUN apt-get install -y build-essential
RUN apt-get install -y puppet
RUN gem install librarian-puppet
ADD Puppetfile /
RUN librarian-puppet install
RUN puppet apply --modulepath=/modules -e "include java8 class { 'tomcat':version => '7',java_home => '/usr/lib/jvm/java-8-oracle'}"
RUN apt-get remove -y make puppet build-essential ruby-dev

Step 4: Build the the application inside a docker directory, for me it’s hello-spring cloned from github:

$ git clone https://github.com/arpitaggarwal/hello-spring.git
$ cd hello-spring
$ mvn clean install

Step 5: Update the Dockerfile adding your .war file location using Docker COPY command:

COPY hello-spring/target/hello-spring.war /var/lib/tomcat7/webapps/
EXPOSE 8080

EXPOSE command specified above refers to Docker command which is good for inter-container communication.

Finally, Dockerfile should like as:

FROM ubuntu:latest
MAINTAINER arpitaggarwal "aggarwalarpit.89@gmail.com"
RUN apt-get -y update
RUN apt-get -q -y install git
RUN sudo apt-get install -y ruby
RUN apt-get install -y ruby-dev
RUN apt-get -y update
RUN apt-get install -y make
RUN apt-get install -y build-essential
RUN apt-get install -y puppet
RUN gem install librarian-puppet
ADD Puppetfile /
RUN librarian-puppet install
RUN puppet apply --modulepath=/modules -e "include java8 class { 'tomcat':version => '7',java_home => '/usr/lib/jvm/java-8-oracle'}"
RUN apt-get remove -y make puppet build-essential ruby-dev
COPY hello-spring/target/hello-spring.war /var/lib/tomcat7/webapps/
EXPOSE 8080

Step 6: Build the Docker container using Docker build command:


docker build --no-cache=true -t spring-application-container .

spring-application-container specified above refers to name of a docker image.

Step 7: Once built, run the container using Docker run command:

docker run -p 8080:8080 --cap-add SYS_PTRACE -it spring-application-container /bin/bash

Step 8: Get your Docker container IP Address, using docker-machine:


docker-machine ip your_vm_name

Next, open the url http://container-ip-address:8080/hello-spring

The complete source code is hosted on github.